
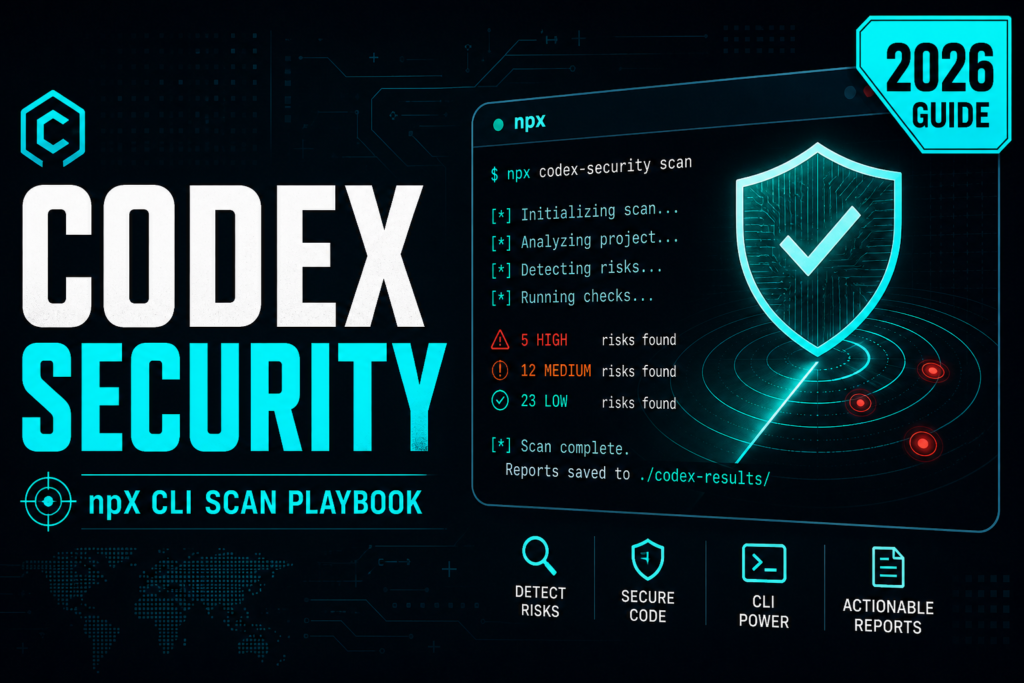
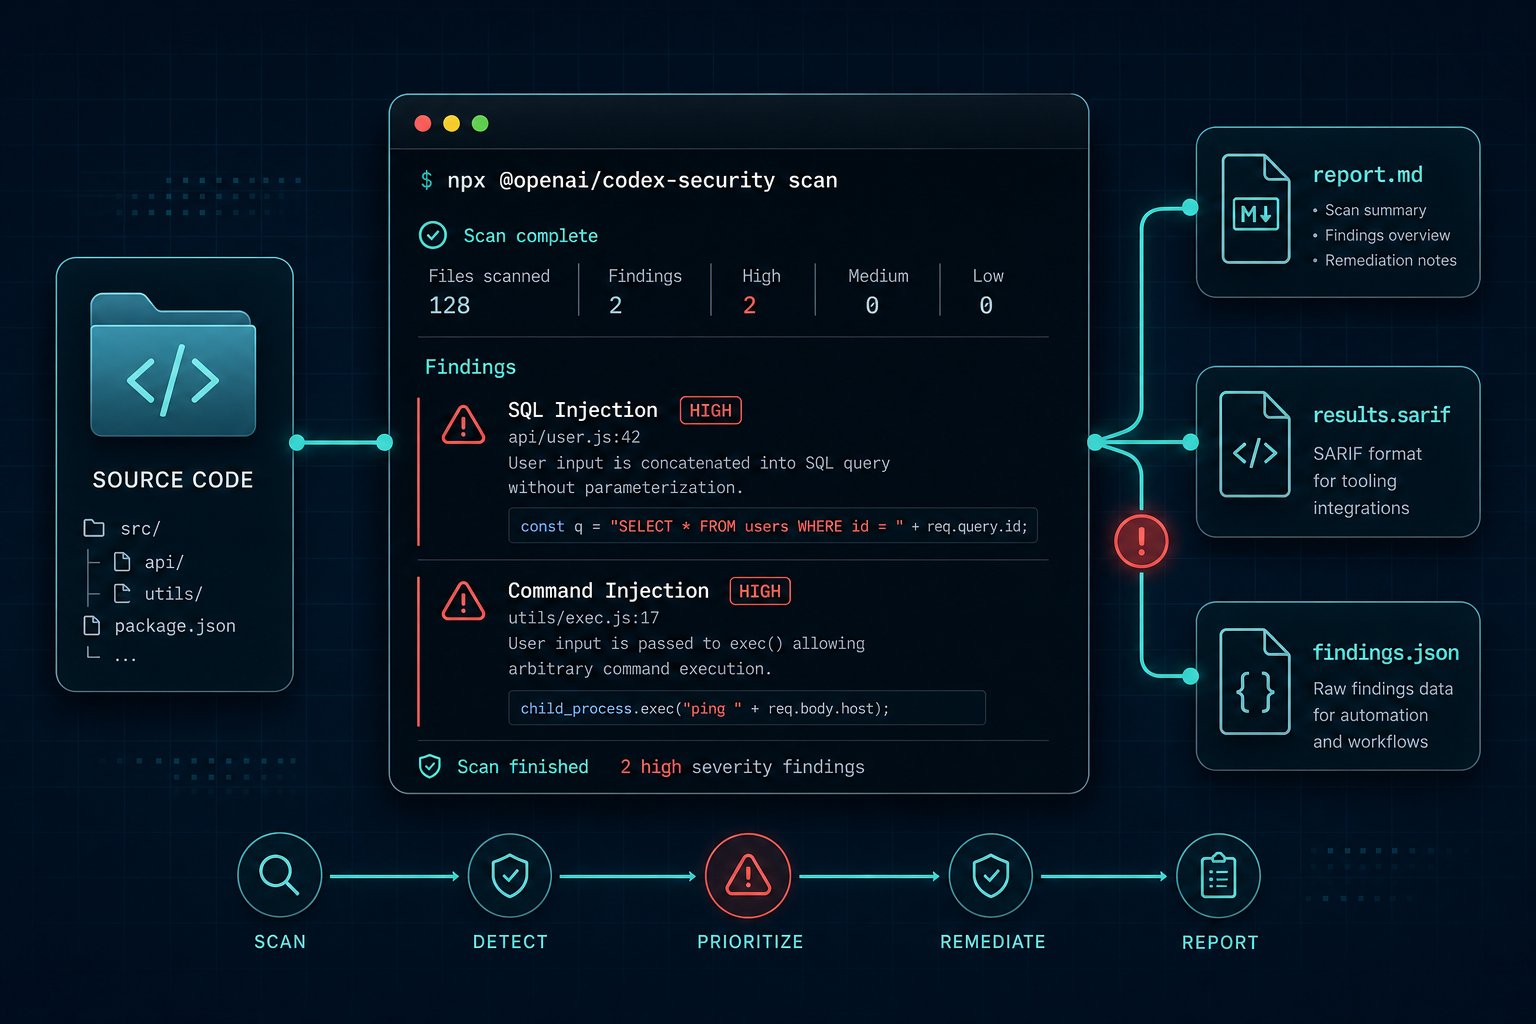
OpenAI quietly open-sourced the Codex Security CLI around late July 2026. It is still early (npm package in the 0.1.x line), but it already does something useful: scan a repo, write a threat model, validate findings, and export SARIF for CI. I pointed it at a small Flask shop API that looks like the kind of service teams actually ship: login, orders, uploads, admin helpers, JWT, YAML parsing. Four minutes and about $1.64 later I had a report with 14 findings - 1 critical, 10 high, 3 medium - plus remediations ready for tickets.
This is the playbook: the right package name, how to dry-run, how to spend wisely, what a realistic findings dump looks like, and why the tool is useful even if you already own Semgrep or CodeQL.
The short version (TL;DR)
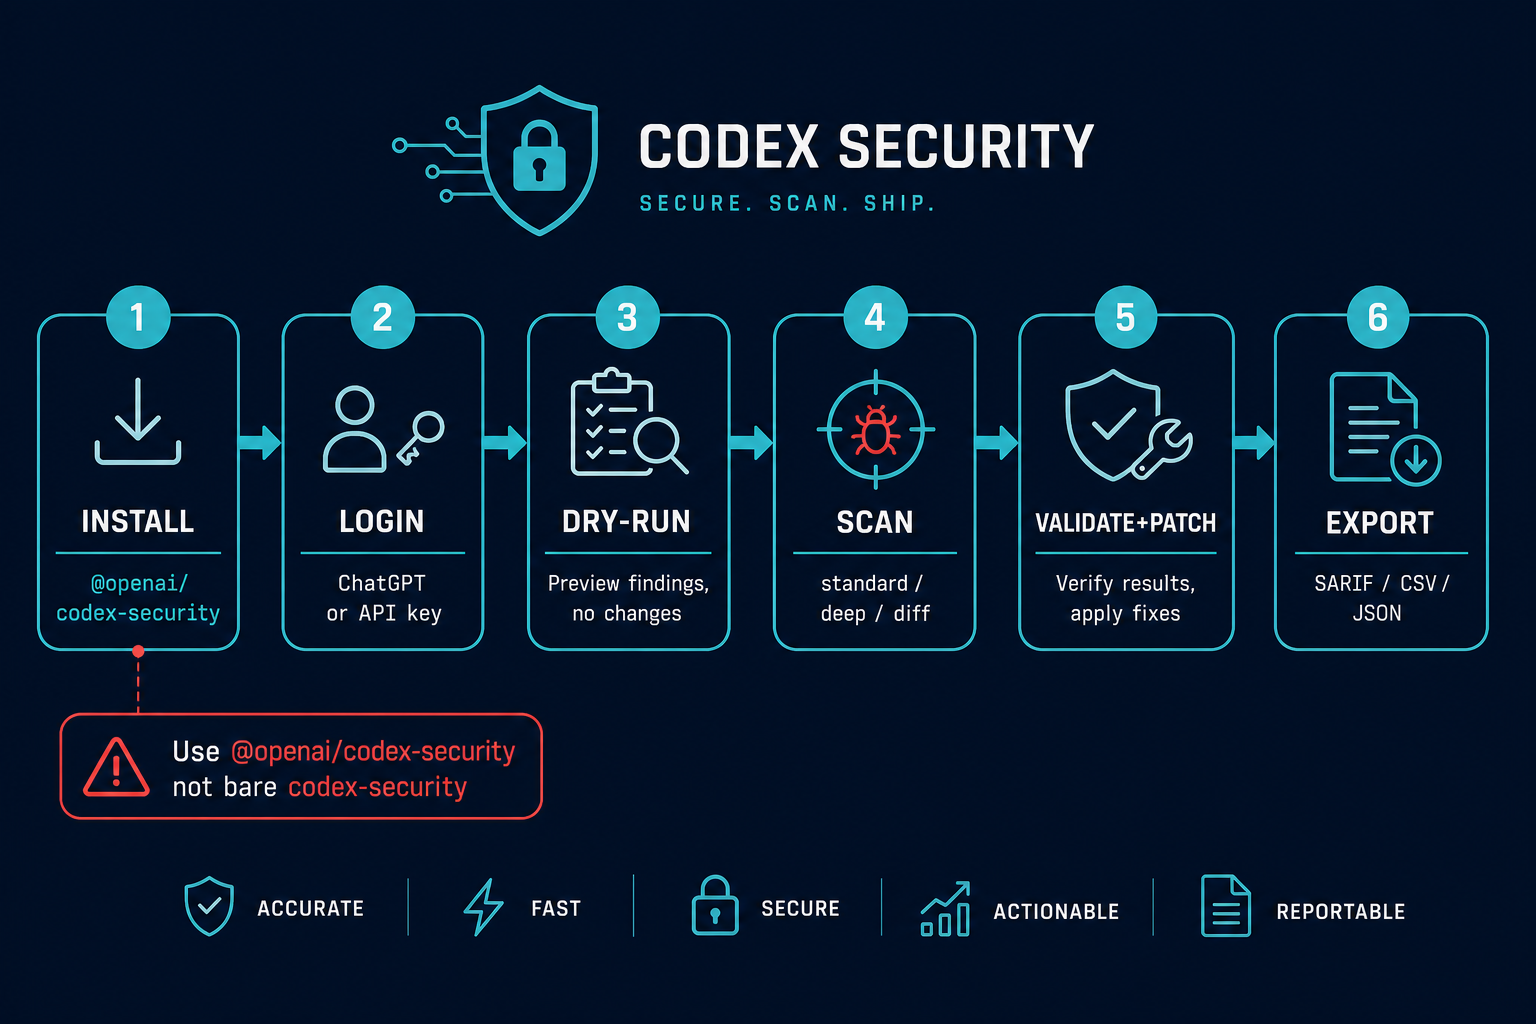
- Recently released: Codex Security CLI landed late July 2026 as an early open-source release (
@openai/codex-security0.1.x). - Use
@openai/codex-security. The bare npm namecodex-securityis an empty placeholder. - Need Node 22+ and Python 3.10+. Auth with ChatGPT login or an OpenAI API key.
- Always dry-run first. Cap spend with
--max-cost. Prefer--path,--diff, or--working-tree. - On my intentional
shop-api-lab(gpt-5.6-terra,--effort medium, pathapp): 14 findings in 252s for ~$1.64 - 1 critical, 10 high, 3 medium. - Rough cost ballpark from my runs (not official pricing): small path ~$1-$3, medium service ~$2-$8, public multi-vuln demos can hit ~$4+ even when findings get dropped. Always set
--max-cost. - You can also connect GitHub: Codex Security cloud for connected repos, or CLI
bulk-scanaftergh auth login. - It writes a threat model, source-to-sink traces, remediations, tests, and SARIF - not just alert titles.
- Only scan repos you own or are authorized to assess. Treat findings like sensitive data.
Why this feels different
Most scanners shout "possible issue." Codex Security tries to tell a story: what the attacker can do, which lines make it real, how confident it is, and how to fix it. On a multi-route shop API that narrative is the part humans burn hours reconstructing. If you are coming from classic AppSec tooling, keep this next to your usual security tools stack rather than replacing it.
Useful does not mean perfect. Coverage can be partial. Findings can be noisy. The value is a reviewable artifact fast enough for a PR comment, a ticket, or a SARIF upload before the merge window closes. For a broader "how an attacker thinks" companion, see How I Would Hack Your Startup in 24 Hours.
The target: a realistic shop API lab
I used an intentional training app under /tmp/shop-api-lab. README says do not deploy. The code still looks like a normal service:
- Flask blueprint under
/api - SQLite users + orders
- JWT auth helpers
- File read / download / upload
- YAML parse on upload
- Admin shell helper
- HTML render helpers and an open redirect
I also tried the public we45 Vulnerable-Flask-App. Codex found a rich candidate set there (~14 candidates, ~$4.20), but the CLI dropped 11 as malformed codeEvidence.id records, so reportable findings landed at zero. That is a real tooling gotcha. For the rest of this post I stick to shop-api-lab, where findings survived the gates cleanly.
Stop: use the scoped package
$ npm view codex-security description
Not the Codex Security CLI - use @openai/codex-security. This unscoped name is an empty placeholder, unaffiliated with OpenAI.

$ npm view @openai/codex-security version
0.1.4
Install and sanity-check
npm install @openai/codex-security@latest

npx @openai/codex-security --version
npx @openai/codex-security --help
npx @openai/codex-security info --json
Defaults today: model gpt-5.6-sol, reasoning effort xhigh. Powerful and expensive. For demos and PR diffs I use gpt-5.6-terra with --effort medium and a hard --max-cost.
Auth in one minute
Two common paths:
# Option A: interactive ChatGPT login (laptop / desktop)
npx @openai/codex-security login
npx @openai/codex-security login status

# Option B: OpenAI API key (CI / scripts)
export OPENAI_API_KEY="sk-..."   # paste your key, or load it from your secret store
# CODEX_API_KEY also works if that is what your environment uses

# If you are already logged in (login status is OK), just scan:
npx @openai/codex-security scan .

# Force API-key auth when both ChatGPT login and an API key exist:
npx @openai/codex-security scan . --auth api-key
You usually do not need --auth api-key if you already ran login successfully, or if OPENAI_API_KEY is the only credential available. Use --auth api-key when you want to force the API-key path (for example in CI, or when both ChatGPT login and an API key are present). ChatGPT workspace credits and OpenAI API billing are different wallets - pick one path and stick to it for the run.
Always dry-run first
mkdir -p /tmp/codex-security-results-shop
chmod 700 /tmp/codex-security-results-shop

cd /tmp/shop-api-lab
npx @openai/codex-security scan . \
  --path app \
  --output-dir /tmp/codex-security-results-shop \
  --model gpt-5.6-terra \
  --effort medium \
  --dry-run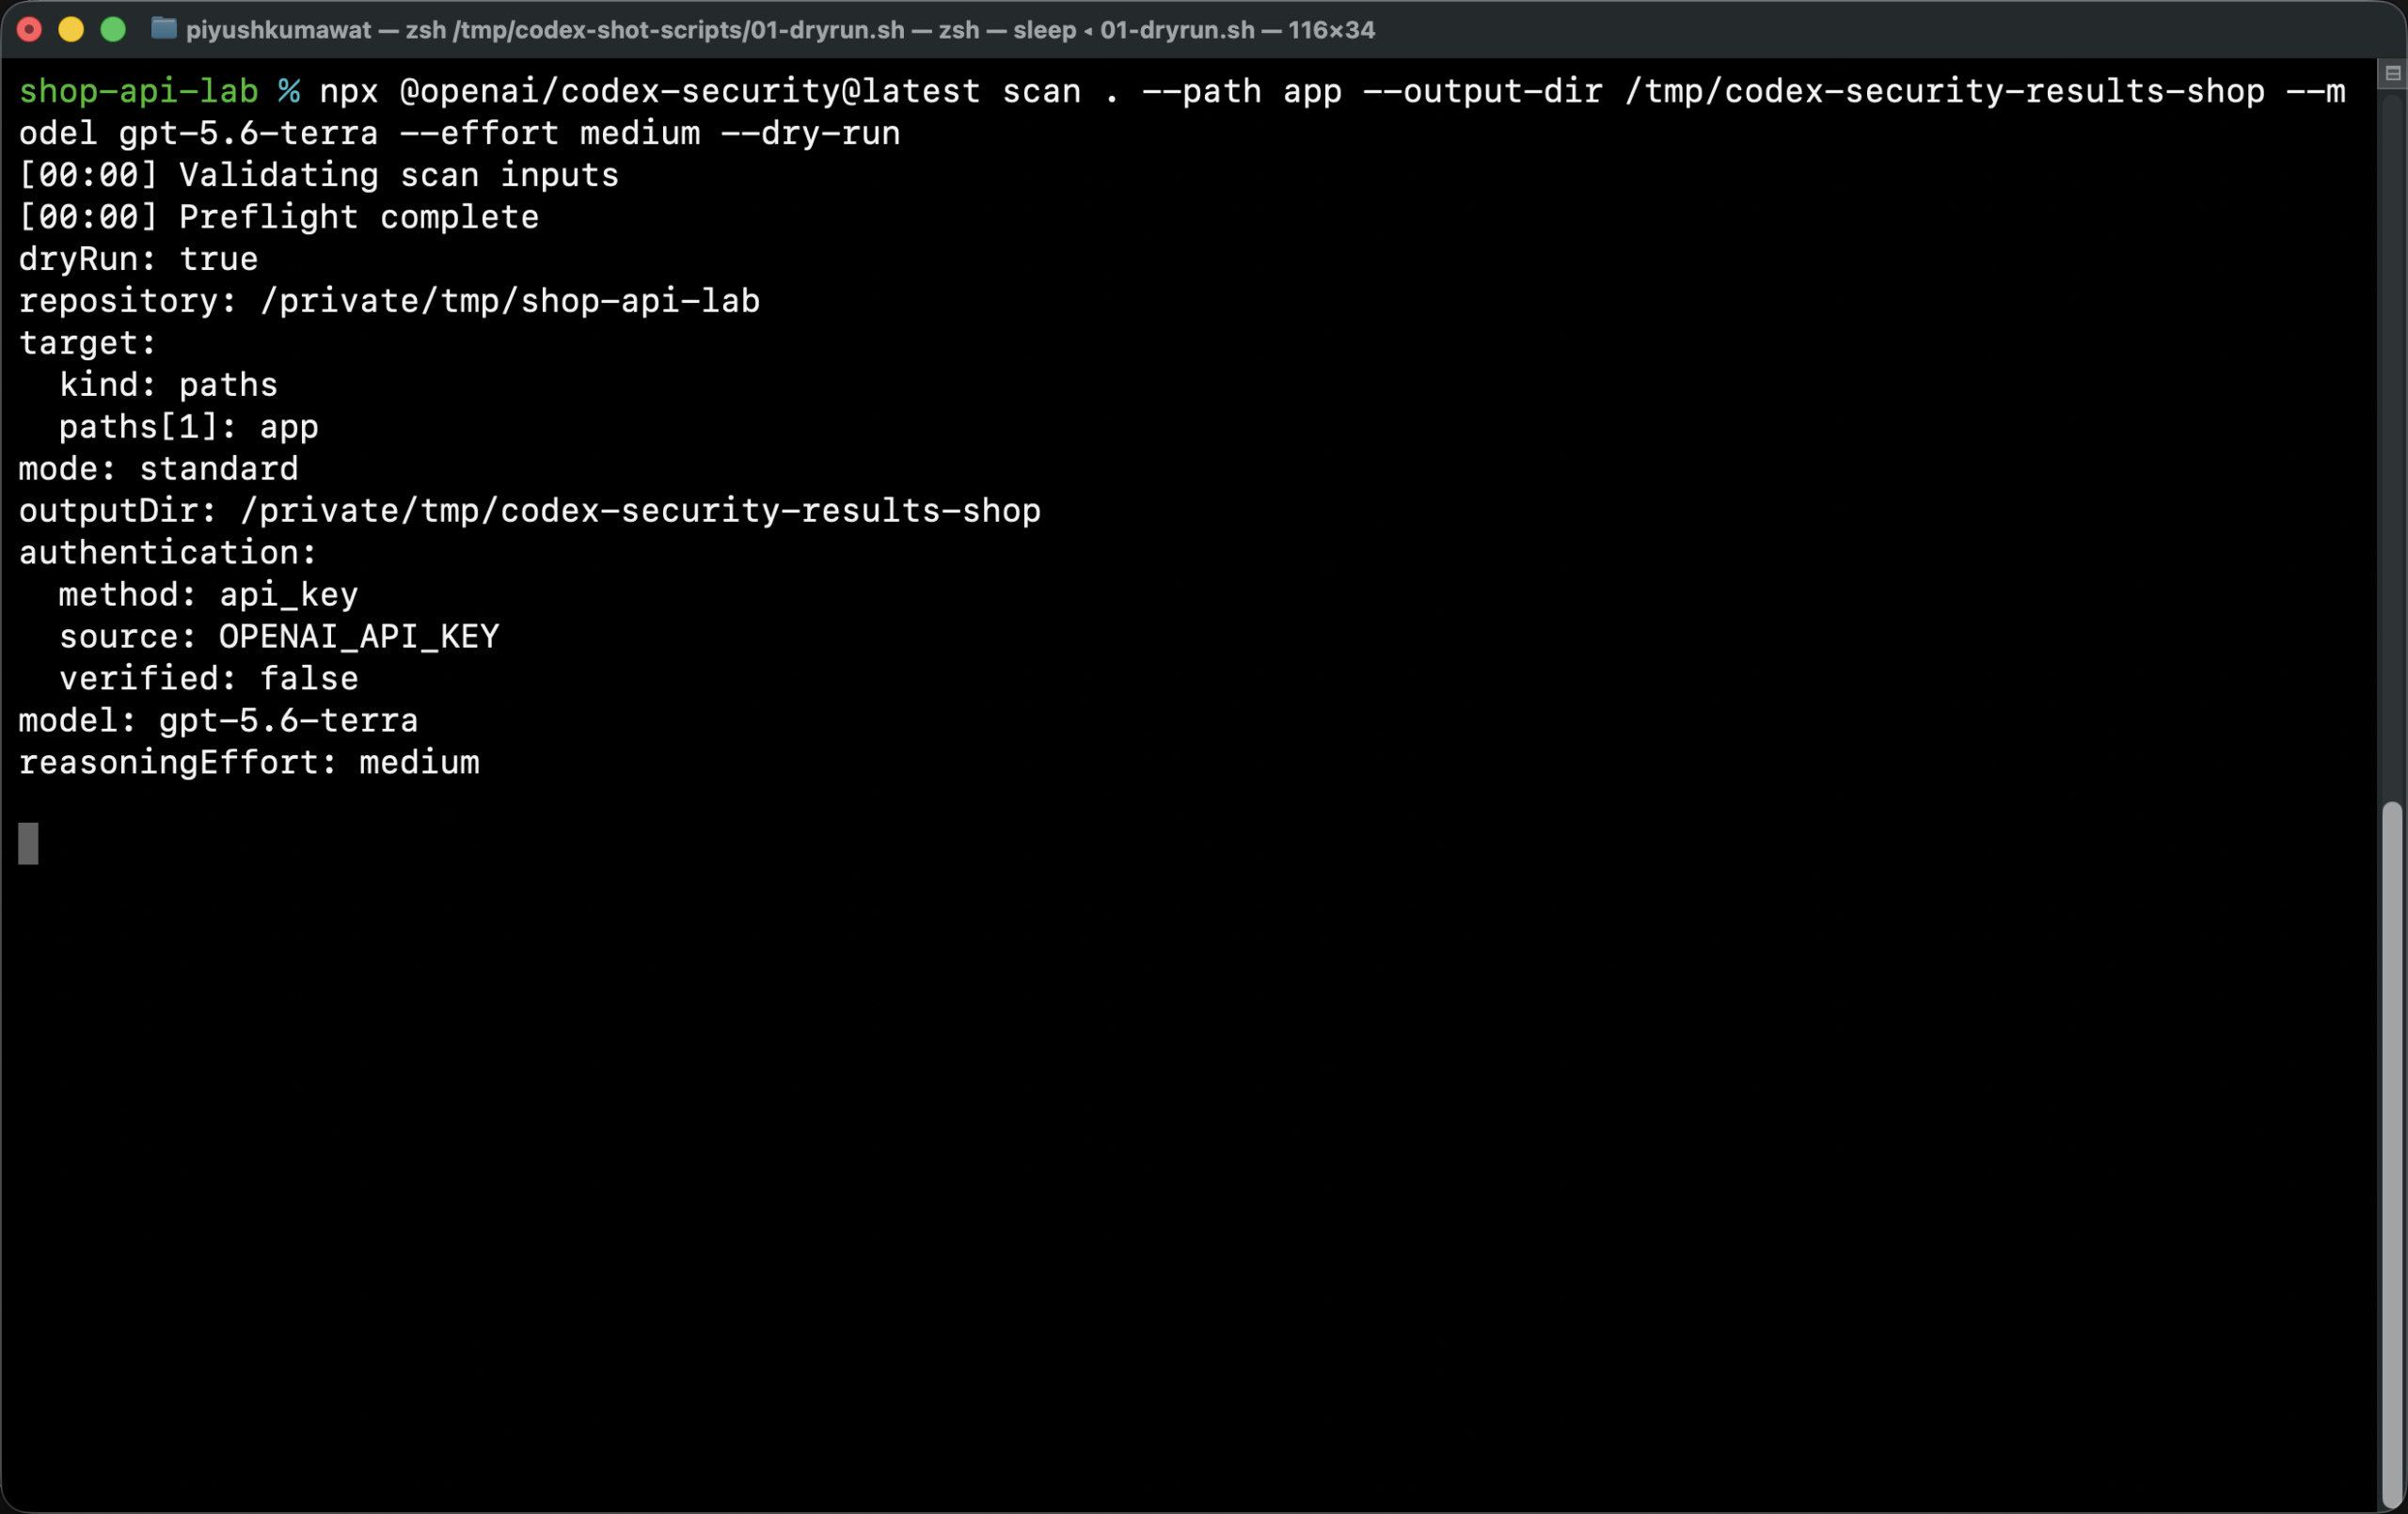
Gotcha: output directories must be chmod 700. The CLI refuses world-readable result folders.
The live scan
cd /tmp/shop-api-lab
# Already authenticated? Skip --auth.
# Using an API key in this shell? export OPENAI_API_KEY="sk-..." first.
npx @openai/codex-security scan . \
  --path app \
  --output-dir /tmp/codex-security-results-shop \
  --model gpt-5.6-terra \
  --effort medium \
  --max-cost 8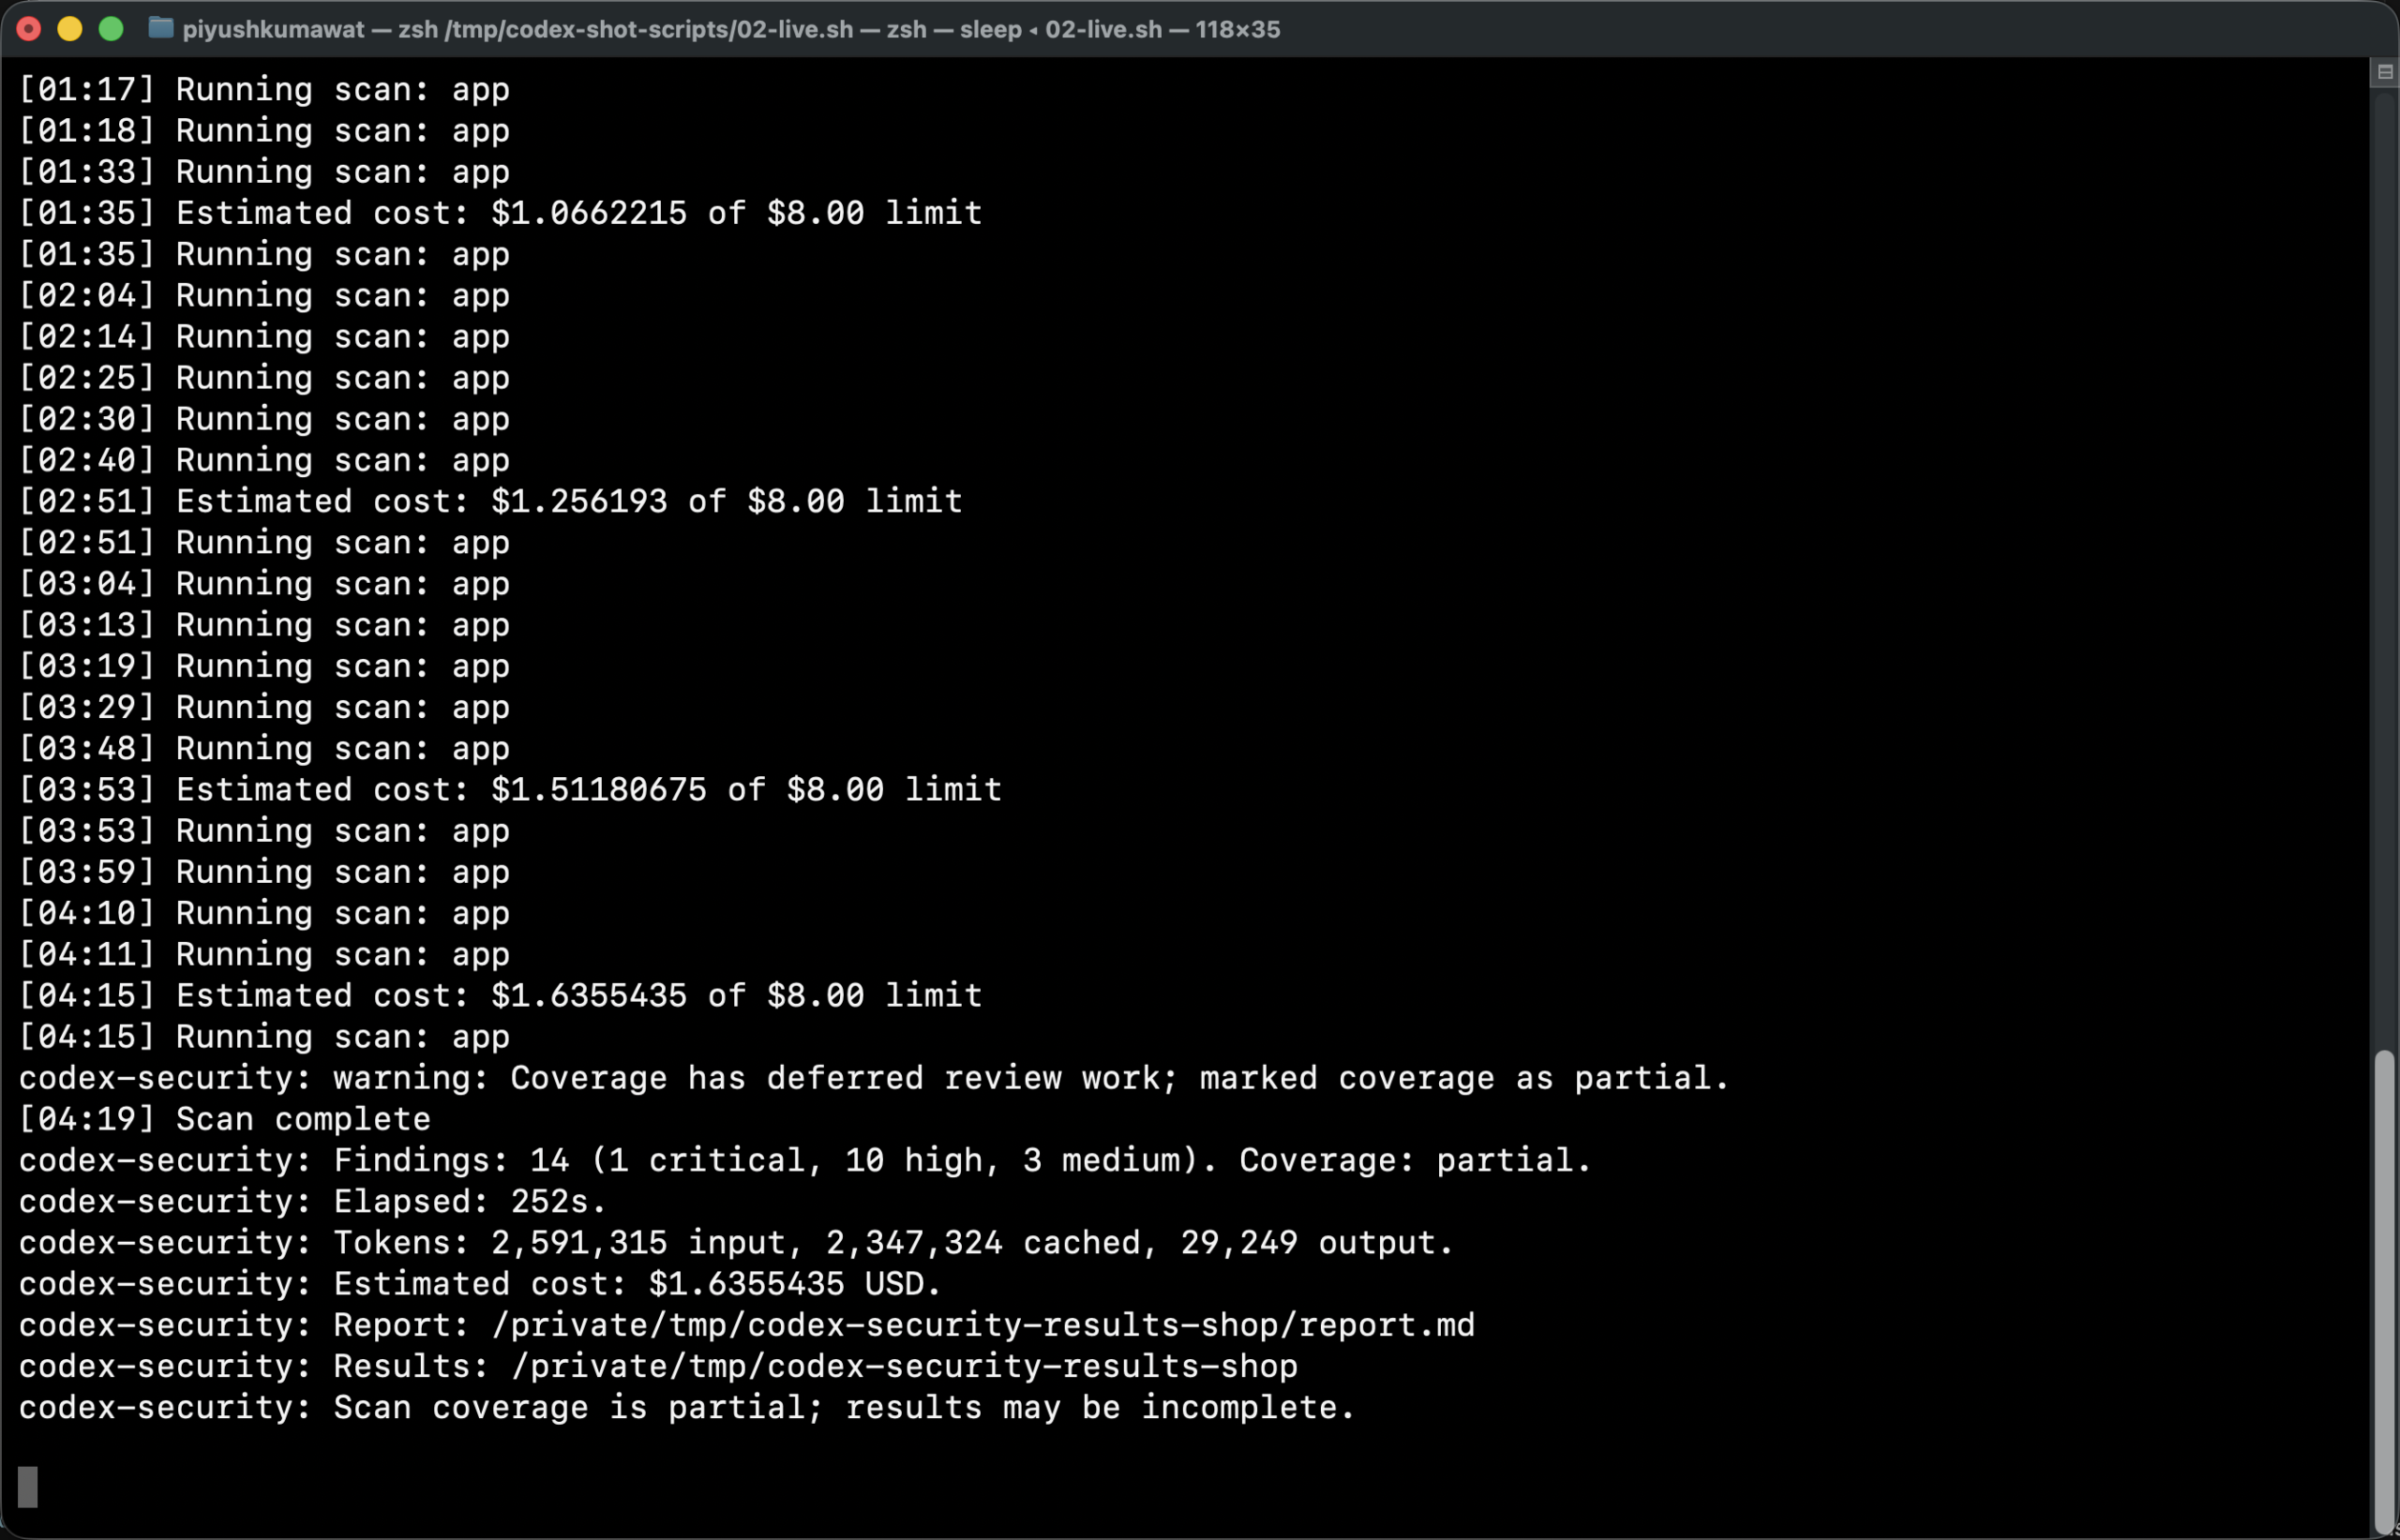
codex-security: Findings: 14 (1 critical, 10 high, 3 medium). Coverage: partial.
codex-security: Elapsed: 252s.
codex-security: Tokens: 2,591,315 input, 2,347,324 cached, 29,249 output.
codex-security: Estimated cost: $1.6355435 USD.
codex-security: Report: /tmp/codex-security-results-shop/report.md
Partial coverage is not a green checkbox. Read coverage.json and the deferred notes before you claim "we scanned everything."
What the results look like (real MD previews)
This is the part people usually want to see before they spend money: what does Codex Security actually hand you? On this run the main human-readable deliverable was report.md (~1,193 lines / ~42KB), plus a deeper threat model under artifacts/01_context/threat_model.md, machine-readable findings.json, coverage.json, and SARIF export.
1) Scan summary + findings table from report.md
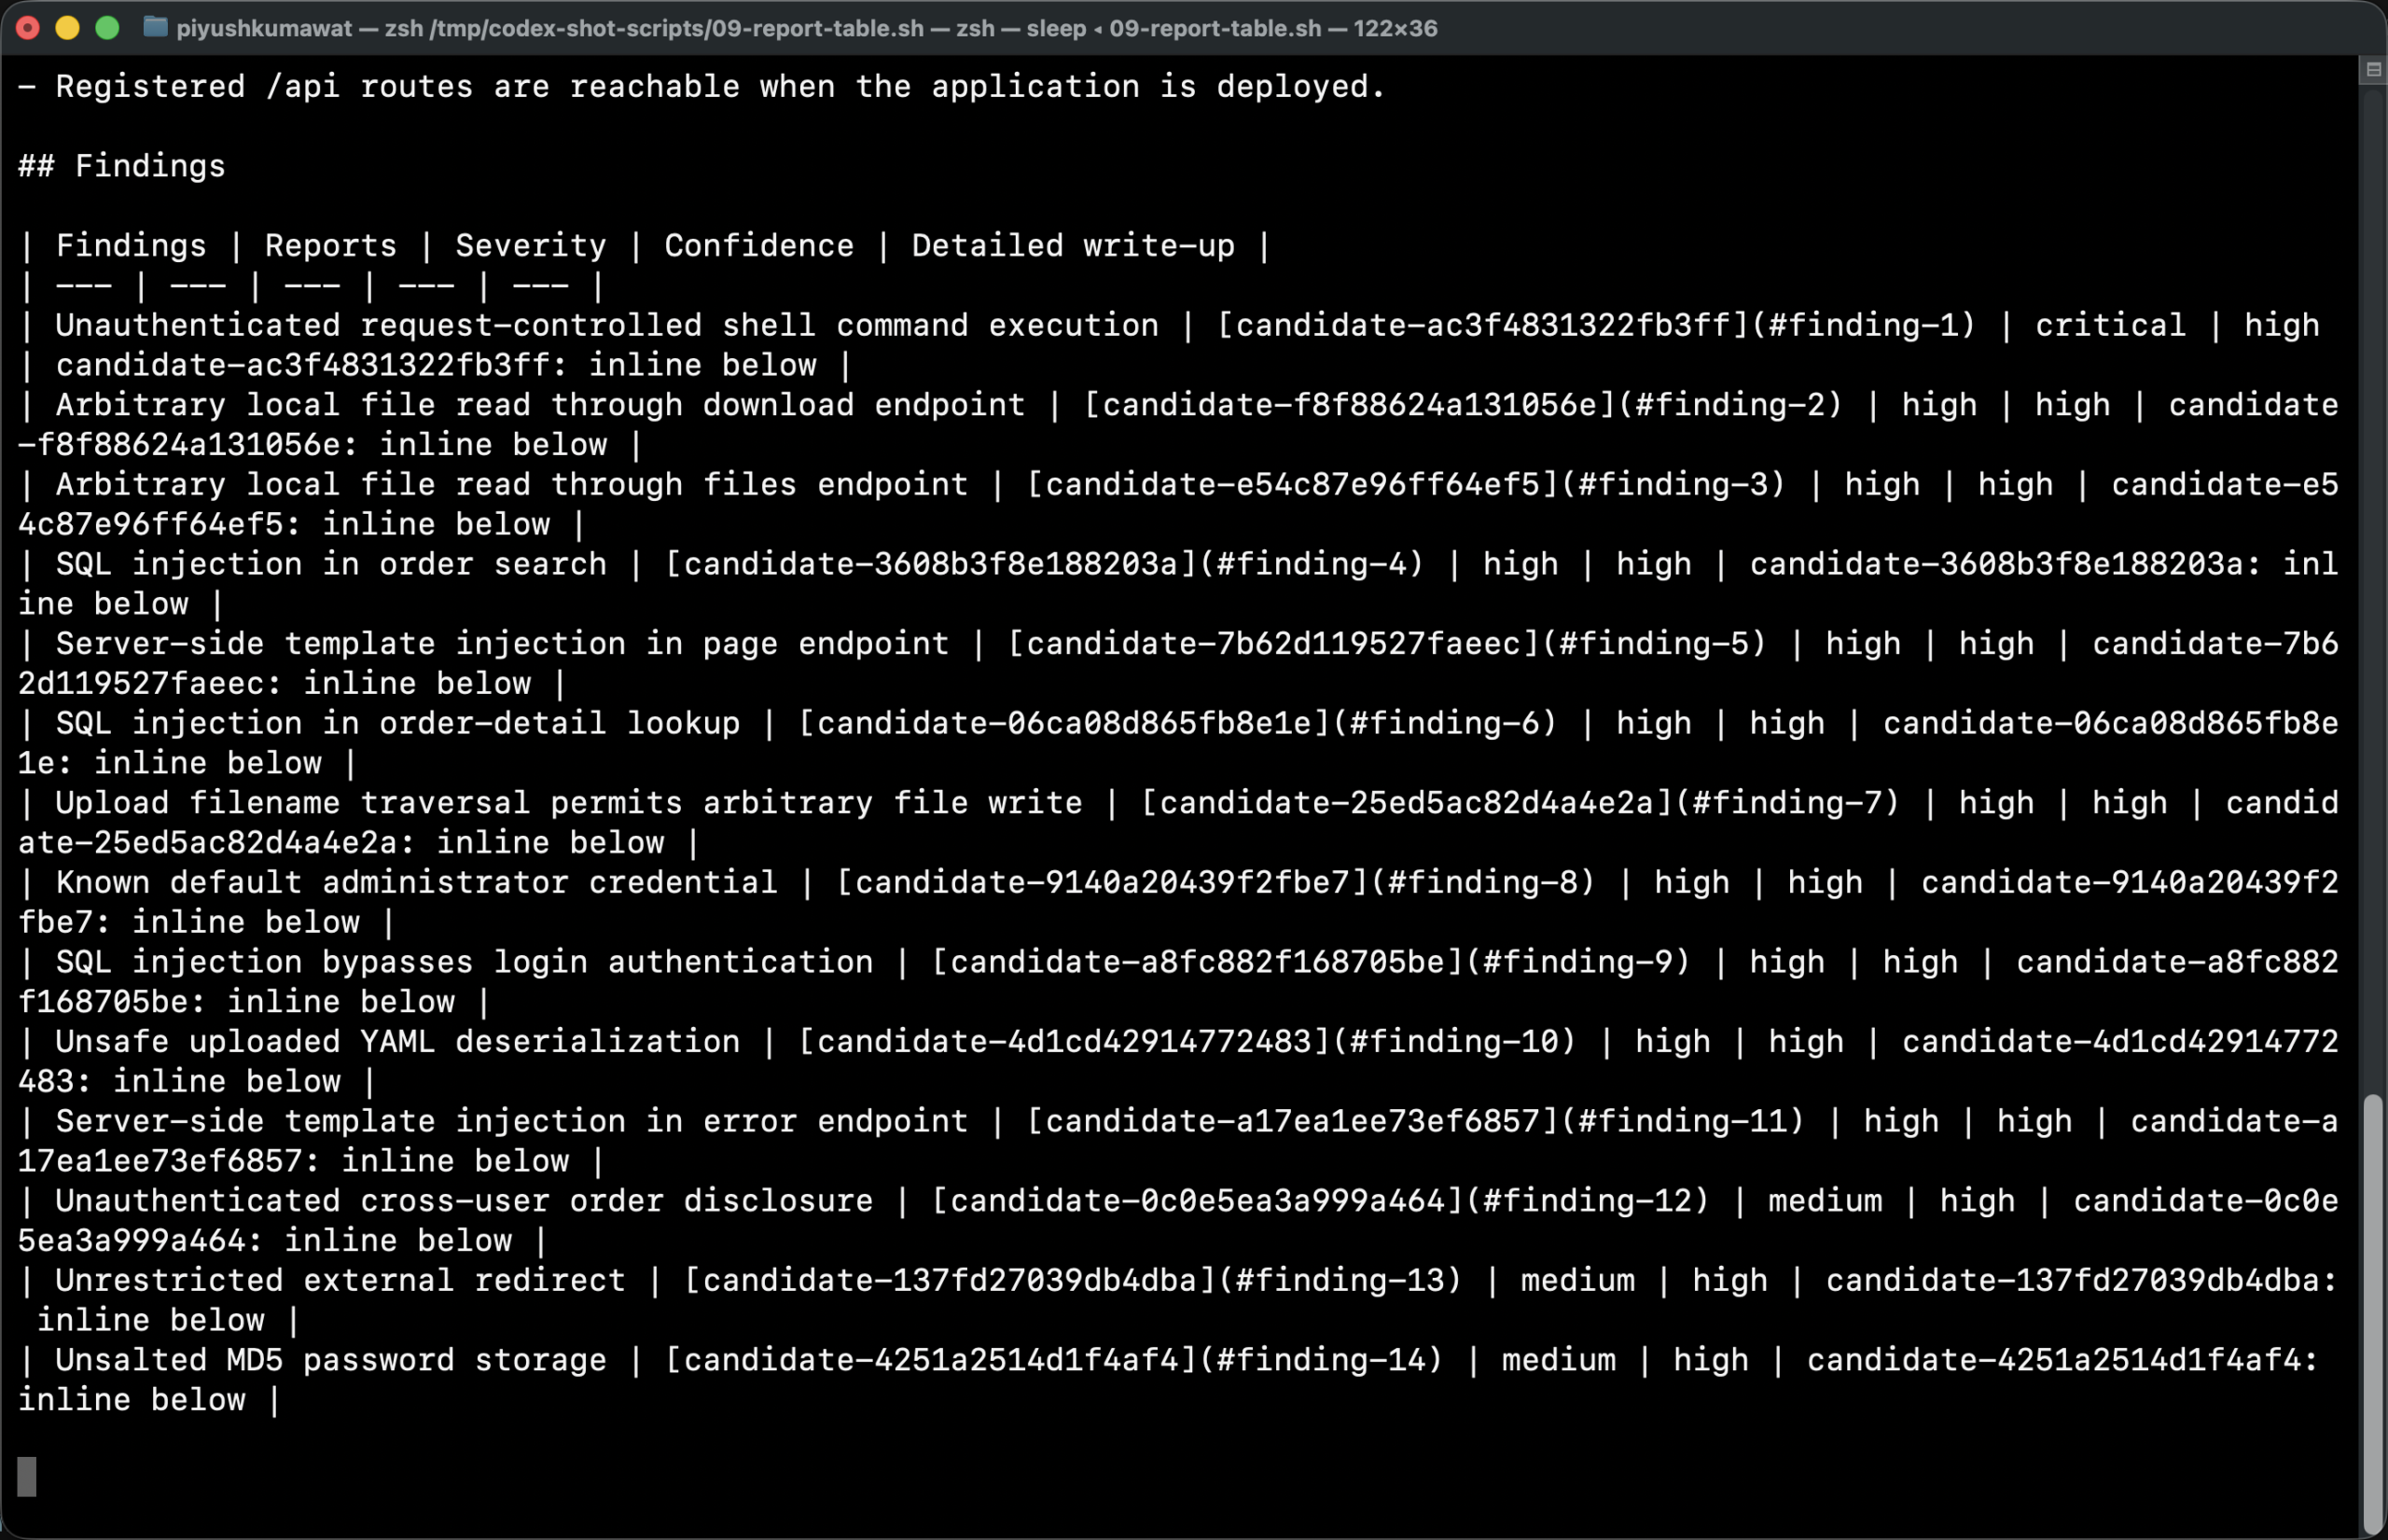
### Scan Summary

| Field | Value |
| --- | --- |
| Reportable DSS findings | 14 |
| Report severity mix | critical: 1, high: 10, medium: 3 |
| Report confidence mix | high: 14 |
| Coverage | partial |

## Threat Model

Flask API accepts unauthenticated HTTP input that reaches database,
filesystem, subprocess, YAML, template, and JWT boundaries.

### Assets
- credentials
- tokens
- orders
- filesystem
- server execution

### Trust Boundaries
- HTTP request to Flask route
- route to SQLite/filesystem/subprocess/parser

### Attacker Capabilities
- send HTTP requests
- upload files
- control query, path, header, and JSON values
2) Deeper threat model artifact
The report threat-model section is the short version. The artifact file goes further: attack surface, attacker stories, partial controls it noticed, and how it calibrates severity.
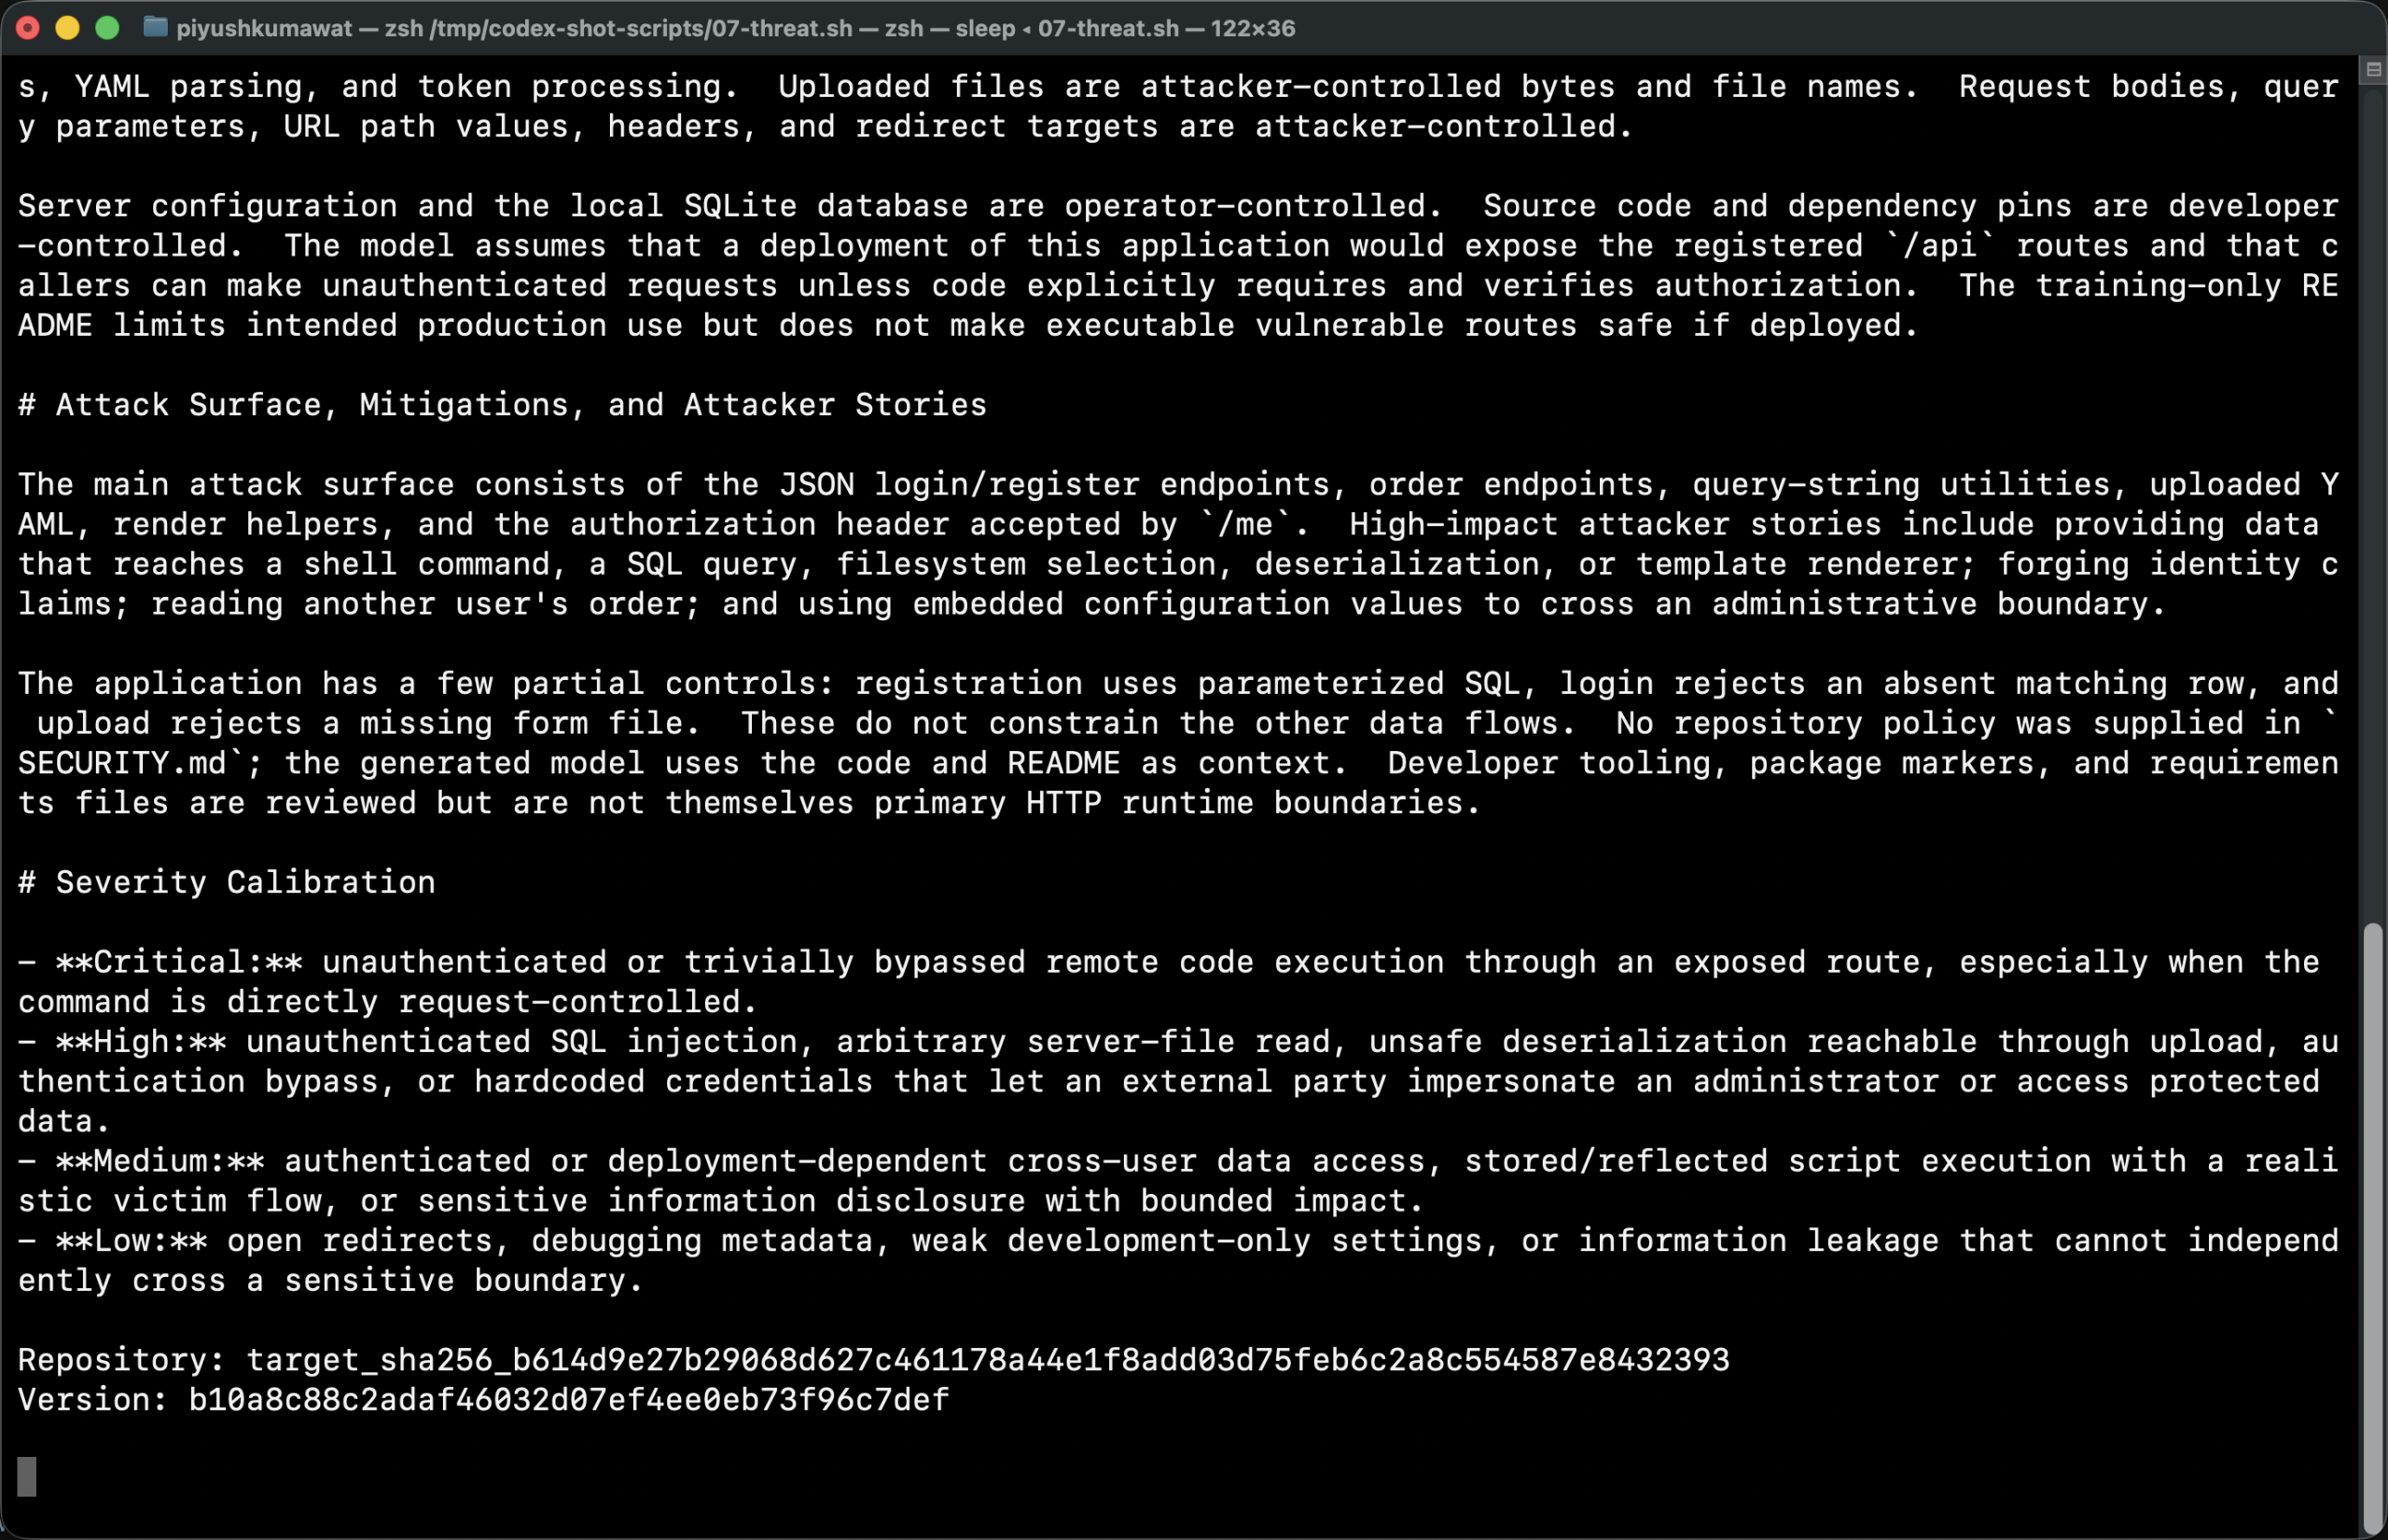
# Attack Surface, Mitigations, and Attacker Stories

The main attack surface consists of the JSON login/register endpoints,
order endpoints, query-string utilities, uploaded YAML, render helpers,
and the authorization header accepted by /me.

High-impact attacker stories include providing data that reaches a shell
command, a SQL query, filesystem selection, deserialization, or template
renderer; forging identity claims; reading another user's order; and using
embedded configuration values to cross an administrative boundary.

# Severity Calibration

- Critical: unauthenticated or trivially bypassed remote code execution
- High: unauthenticated SQLi, arbitrary file read, unsafe deserialization,
  auth bypass, or hardcoded admin credentials
- Medium: cross-user data access, realistic XSS-style flows, bounded disclosure
- Low: open redirects, debug metadata, weak dev-only settings
3) One finding write-up (critical shell RCE)
Each finding is not just a title. You get severity, confidence, CWE, affected lines, summary, root cause, code evidence (entrypoint / control / sink), validation notes, severity rationale, remediation, tests, and preventive controls.
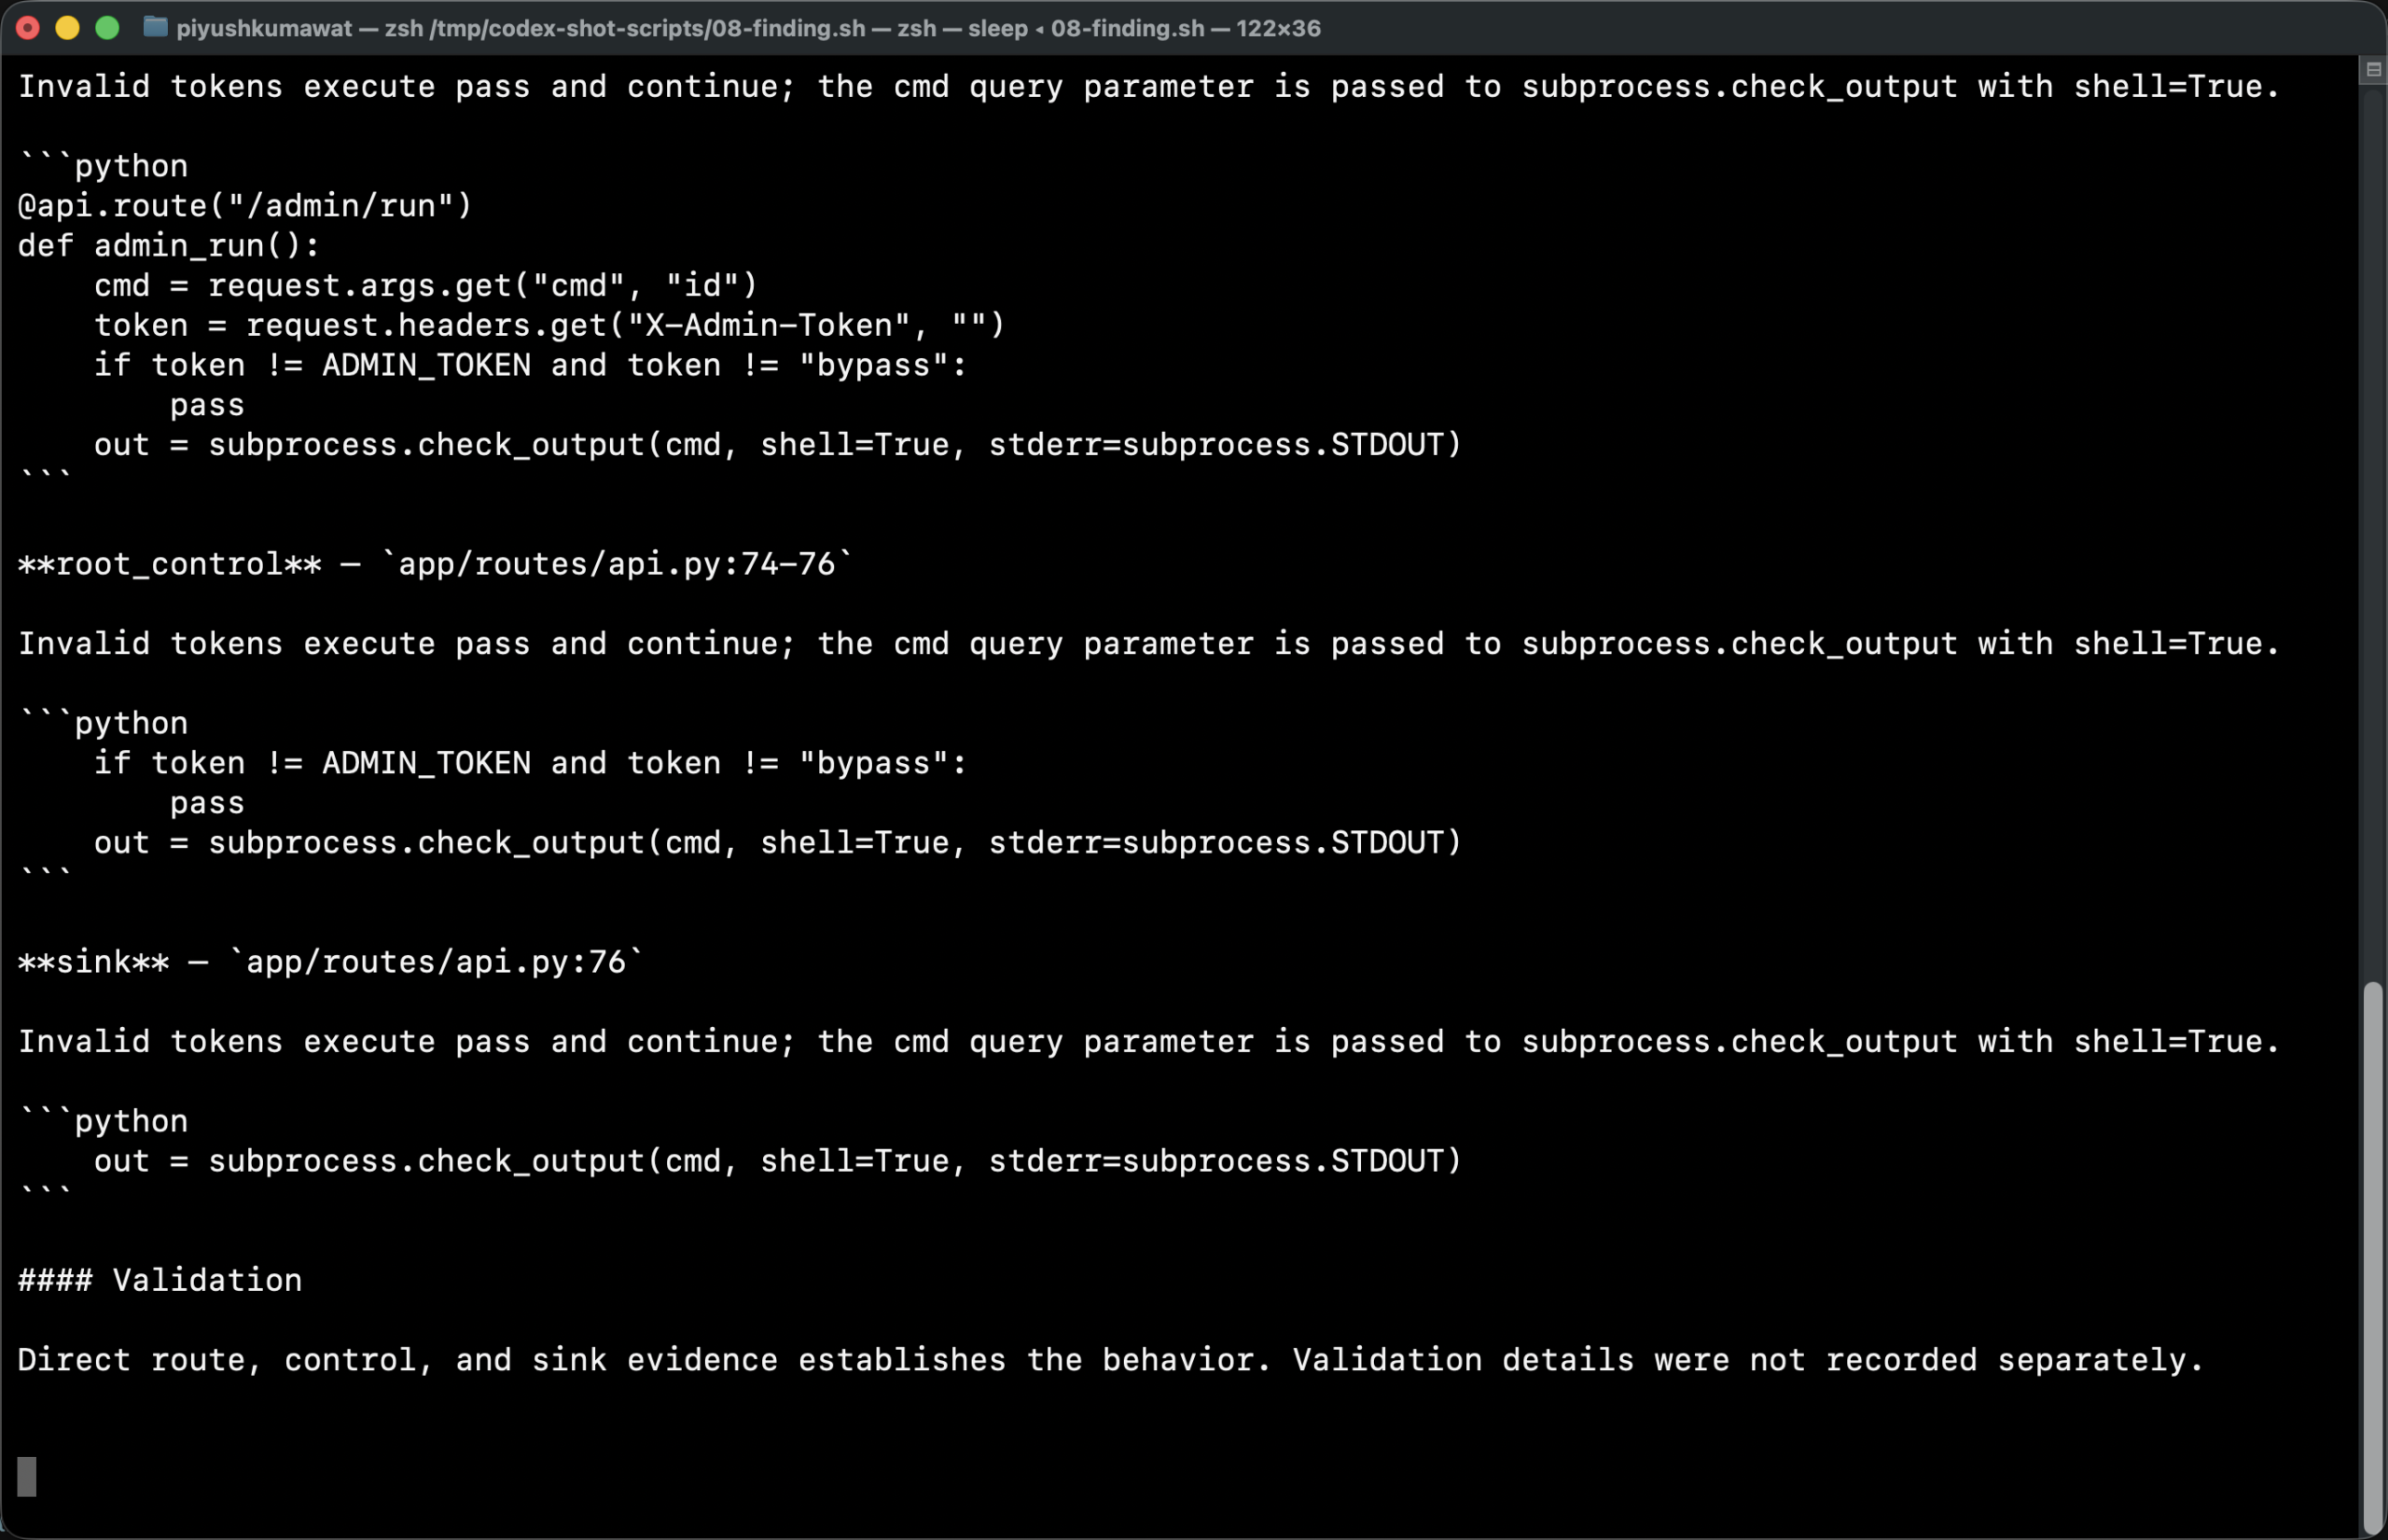
### [1] Unauthenticated request-controlled shell command execution

| Field | Value |
| --- | --- |
| Severity | critical |
| Confidence | high |
| Category | OS command injection |
| CWE | CWE-78 |
| Affected lines | app/routes/api.py:70-76 |

#### Summary
Admin command route executes request-controlled shell commands without
effective authorization.

#### Root Cause
Invalid tokens execute pass and continue; the cmd query parameter is passed
to subprocess.check_output with shell=True.

@api.route("/admin/run")
def admin_run():
    cmd = request.args.get("cmd", "id")
    token = request.headers.get("X-Admin-Token", "")
    if token != ADMIN_TOKEN and token != "bypass":
        pass
    out = subprocess.check_output(cmd, shell=True, stderr=subprocess.STDOUT)

#### Remediation
Remove shell execution from the HTTP route; enforce server-side authorization
with an immediate denial and use an allowlisted argv array for any required
operation.

Tests:
- Add a focused route-level regression test that rejects the prior malicious input.

Preventive controls:
- Require parameterization, authorization, and untrusted-data handling checks
  in code review.
4) What kinds of results you get overall
report.md- human review: scope, threat model, findings table, full write-ups, reviewed surfacesartifacts/01_context/threat_model.md- deeper assets / trust boundaries / attacker stories / severity rubricfindings.json- structured findings for tooling (IDs, locations, remediation, confidence)coverage.json- what was reviewed vs deferred (partial vs complete)scan-manifest.json- scan config fingerprint / provenance- SARIF / JSON / CSV export - drop into GitHub code scanning or your defect tracker
In short: you get a security review packet, not a one-line alert. That is why the tool is useful even when you already know the bug class names.
5) Tiny script: clickable HTML overview
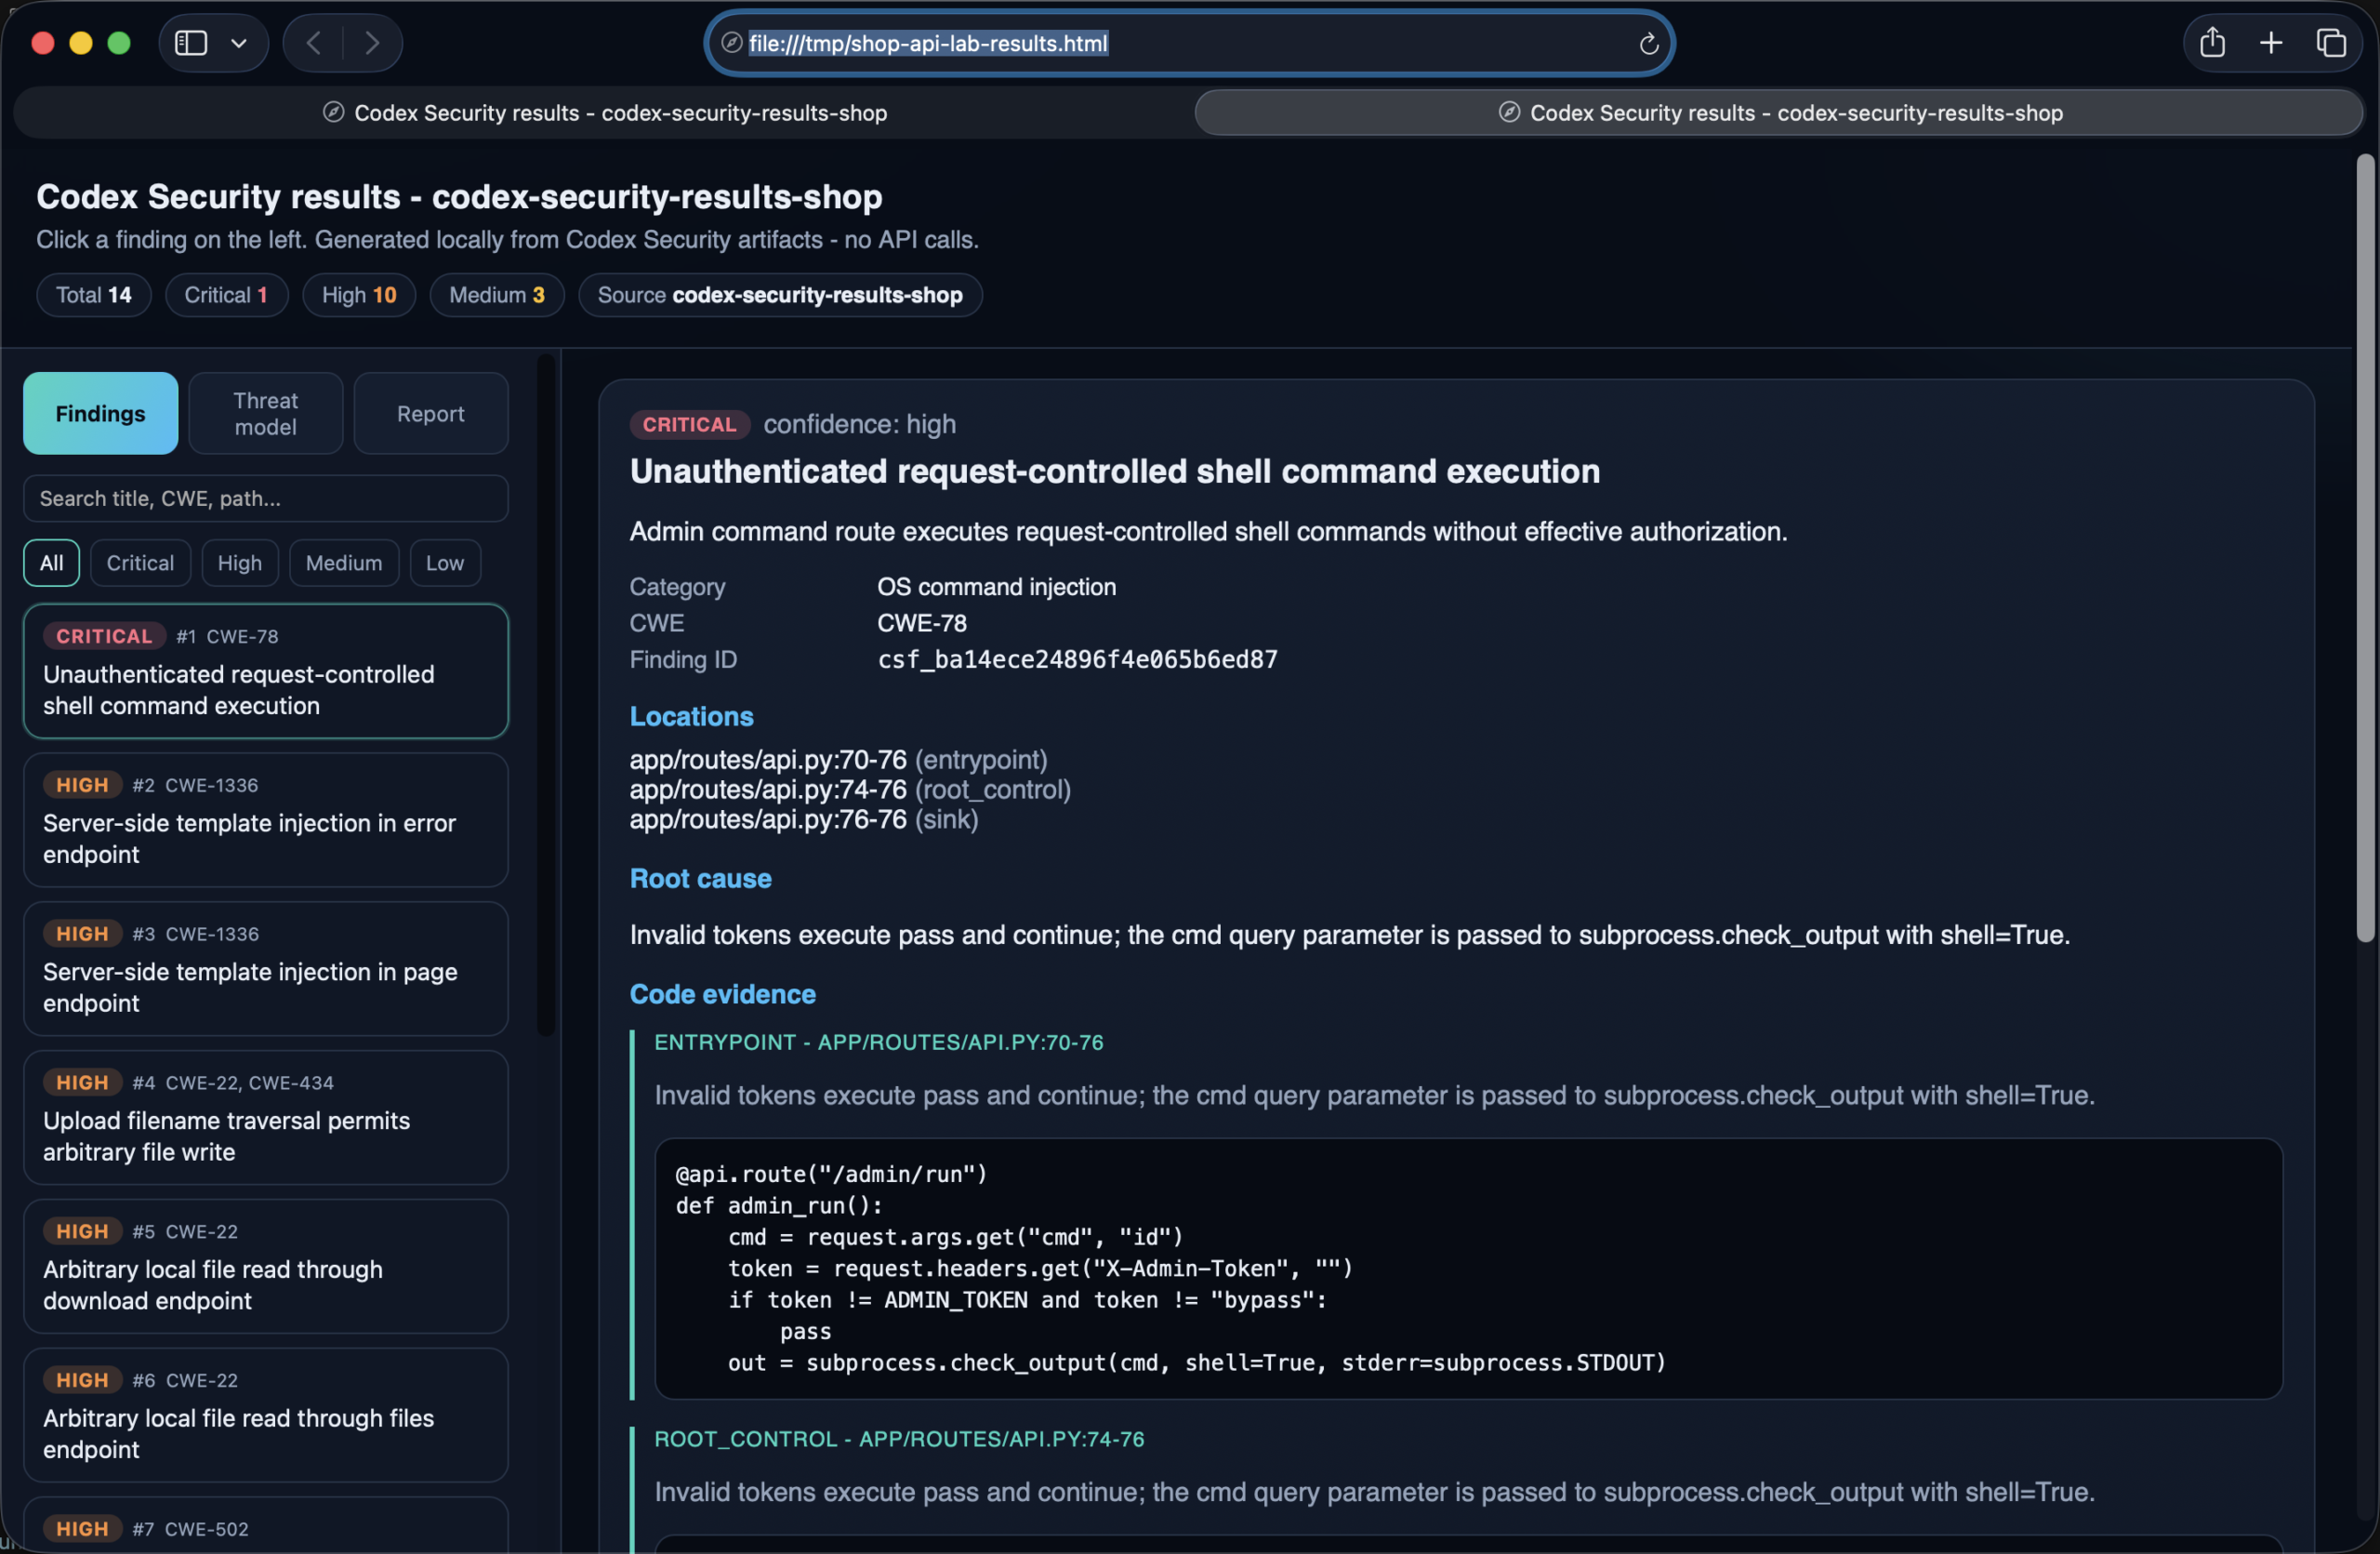
Markdown and JSON are great for machines and tickets. For a demo review, I wanted something you can click through. So I wrote a very small local script that turns a Codex Security results directory into one self-contained HTML page: severity filters, search, finding detail pane, a properly rendered threat-model tab, and the full report. No API calls. No server.
python3 tools/codex_security_results_html.py /tmp/codex-security-results-shop \
  -o /tmp/shop-api-lab-results.html

open /tmp/shop-api-lab-results.html
What you get in the browser:
- Top stats: total / critical / high / medium
- Left nav of findings - click one to open the write-up
- Filter by severity + search by title / CWE / path
- Detail view with locations, root cause, code evidence, remediation, tests, preventive controls
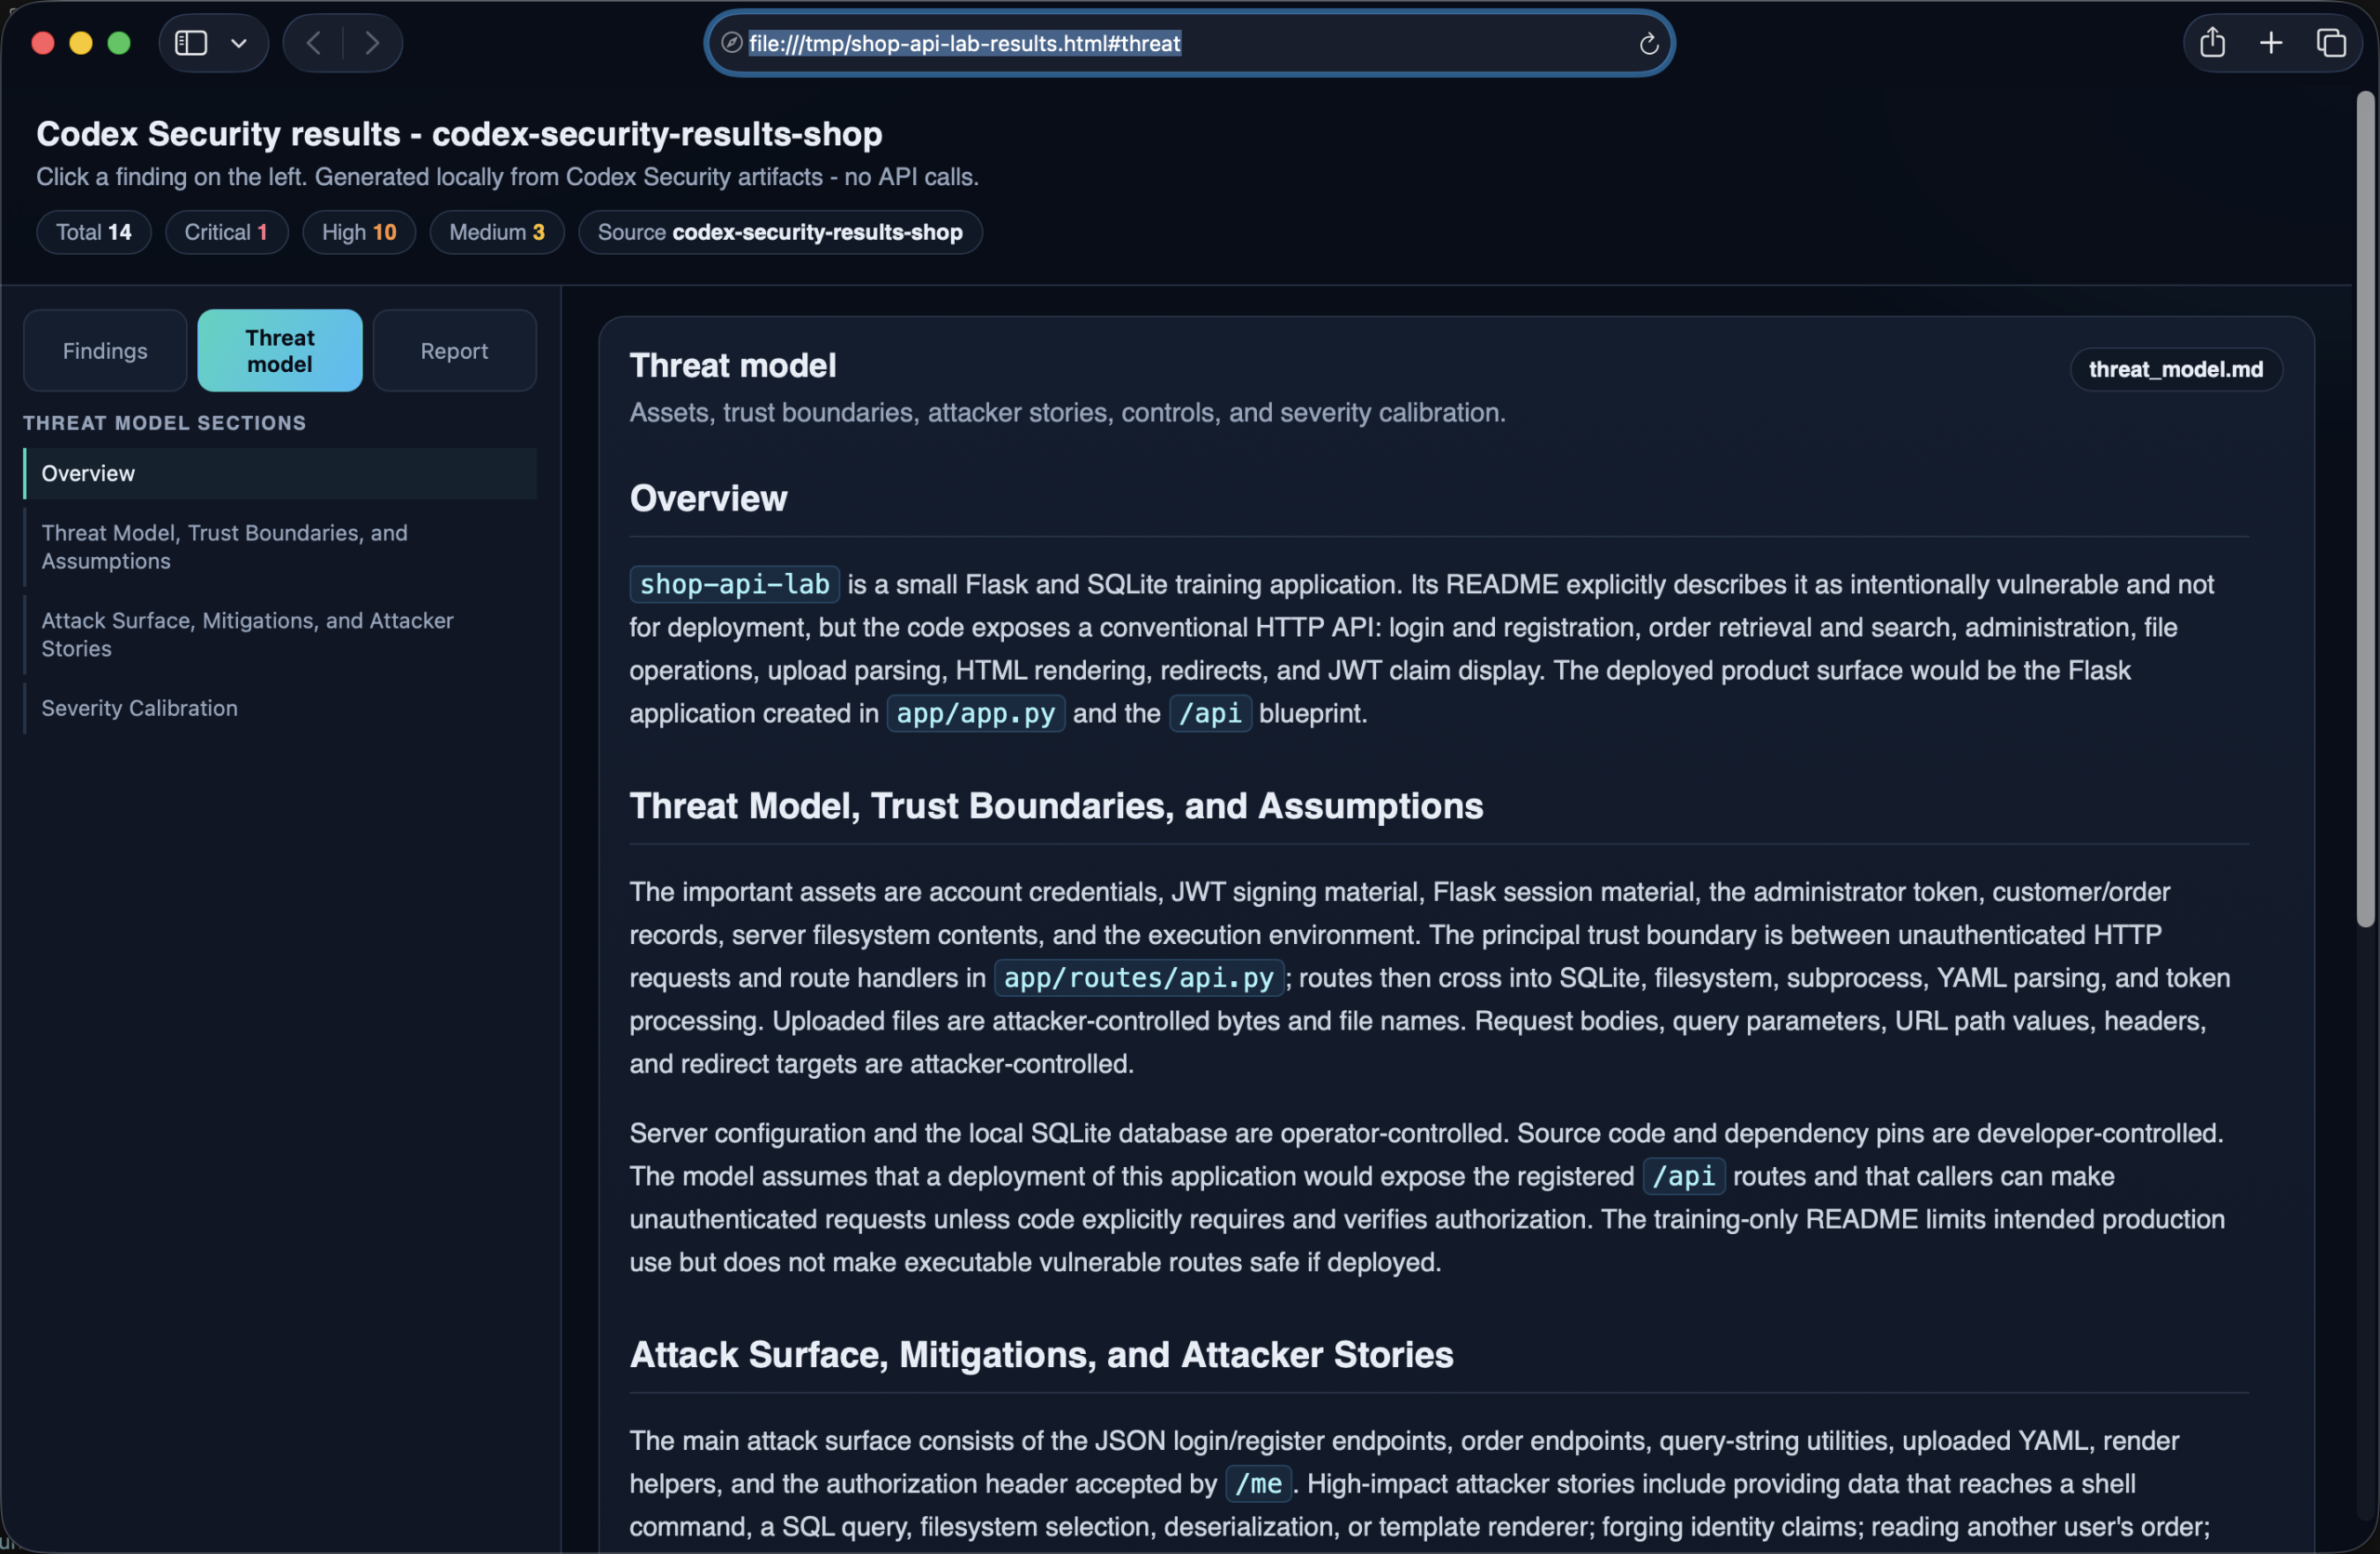
- Threat Model tab with clickable section navigation
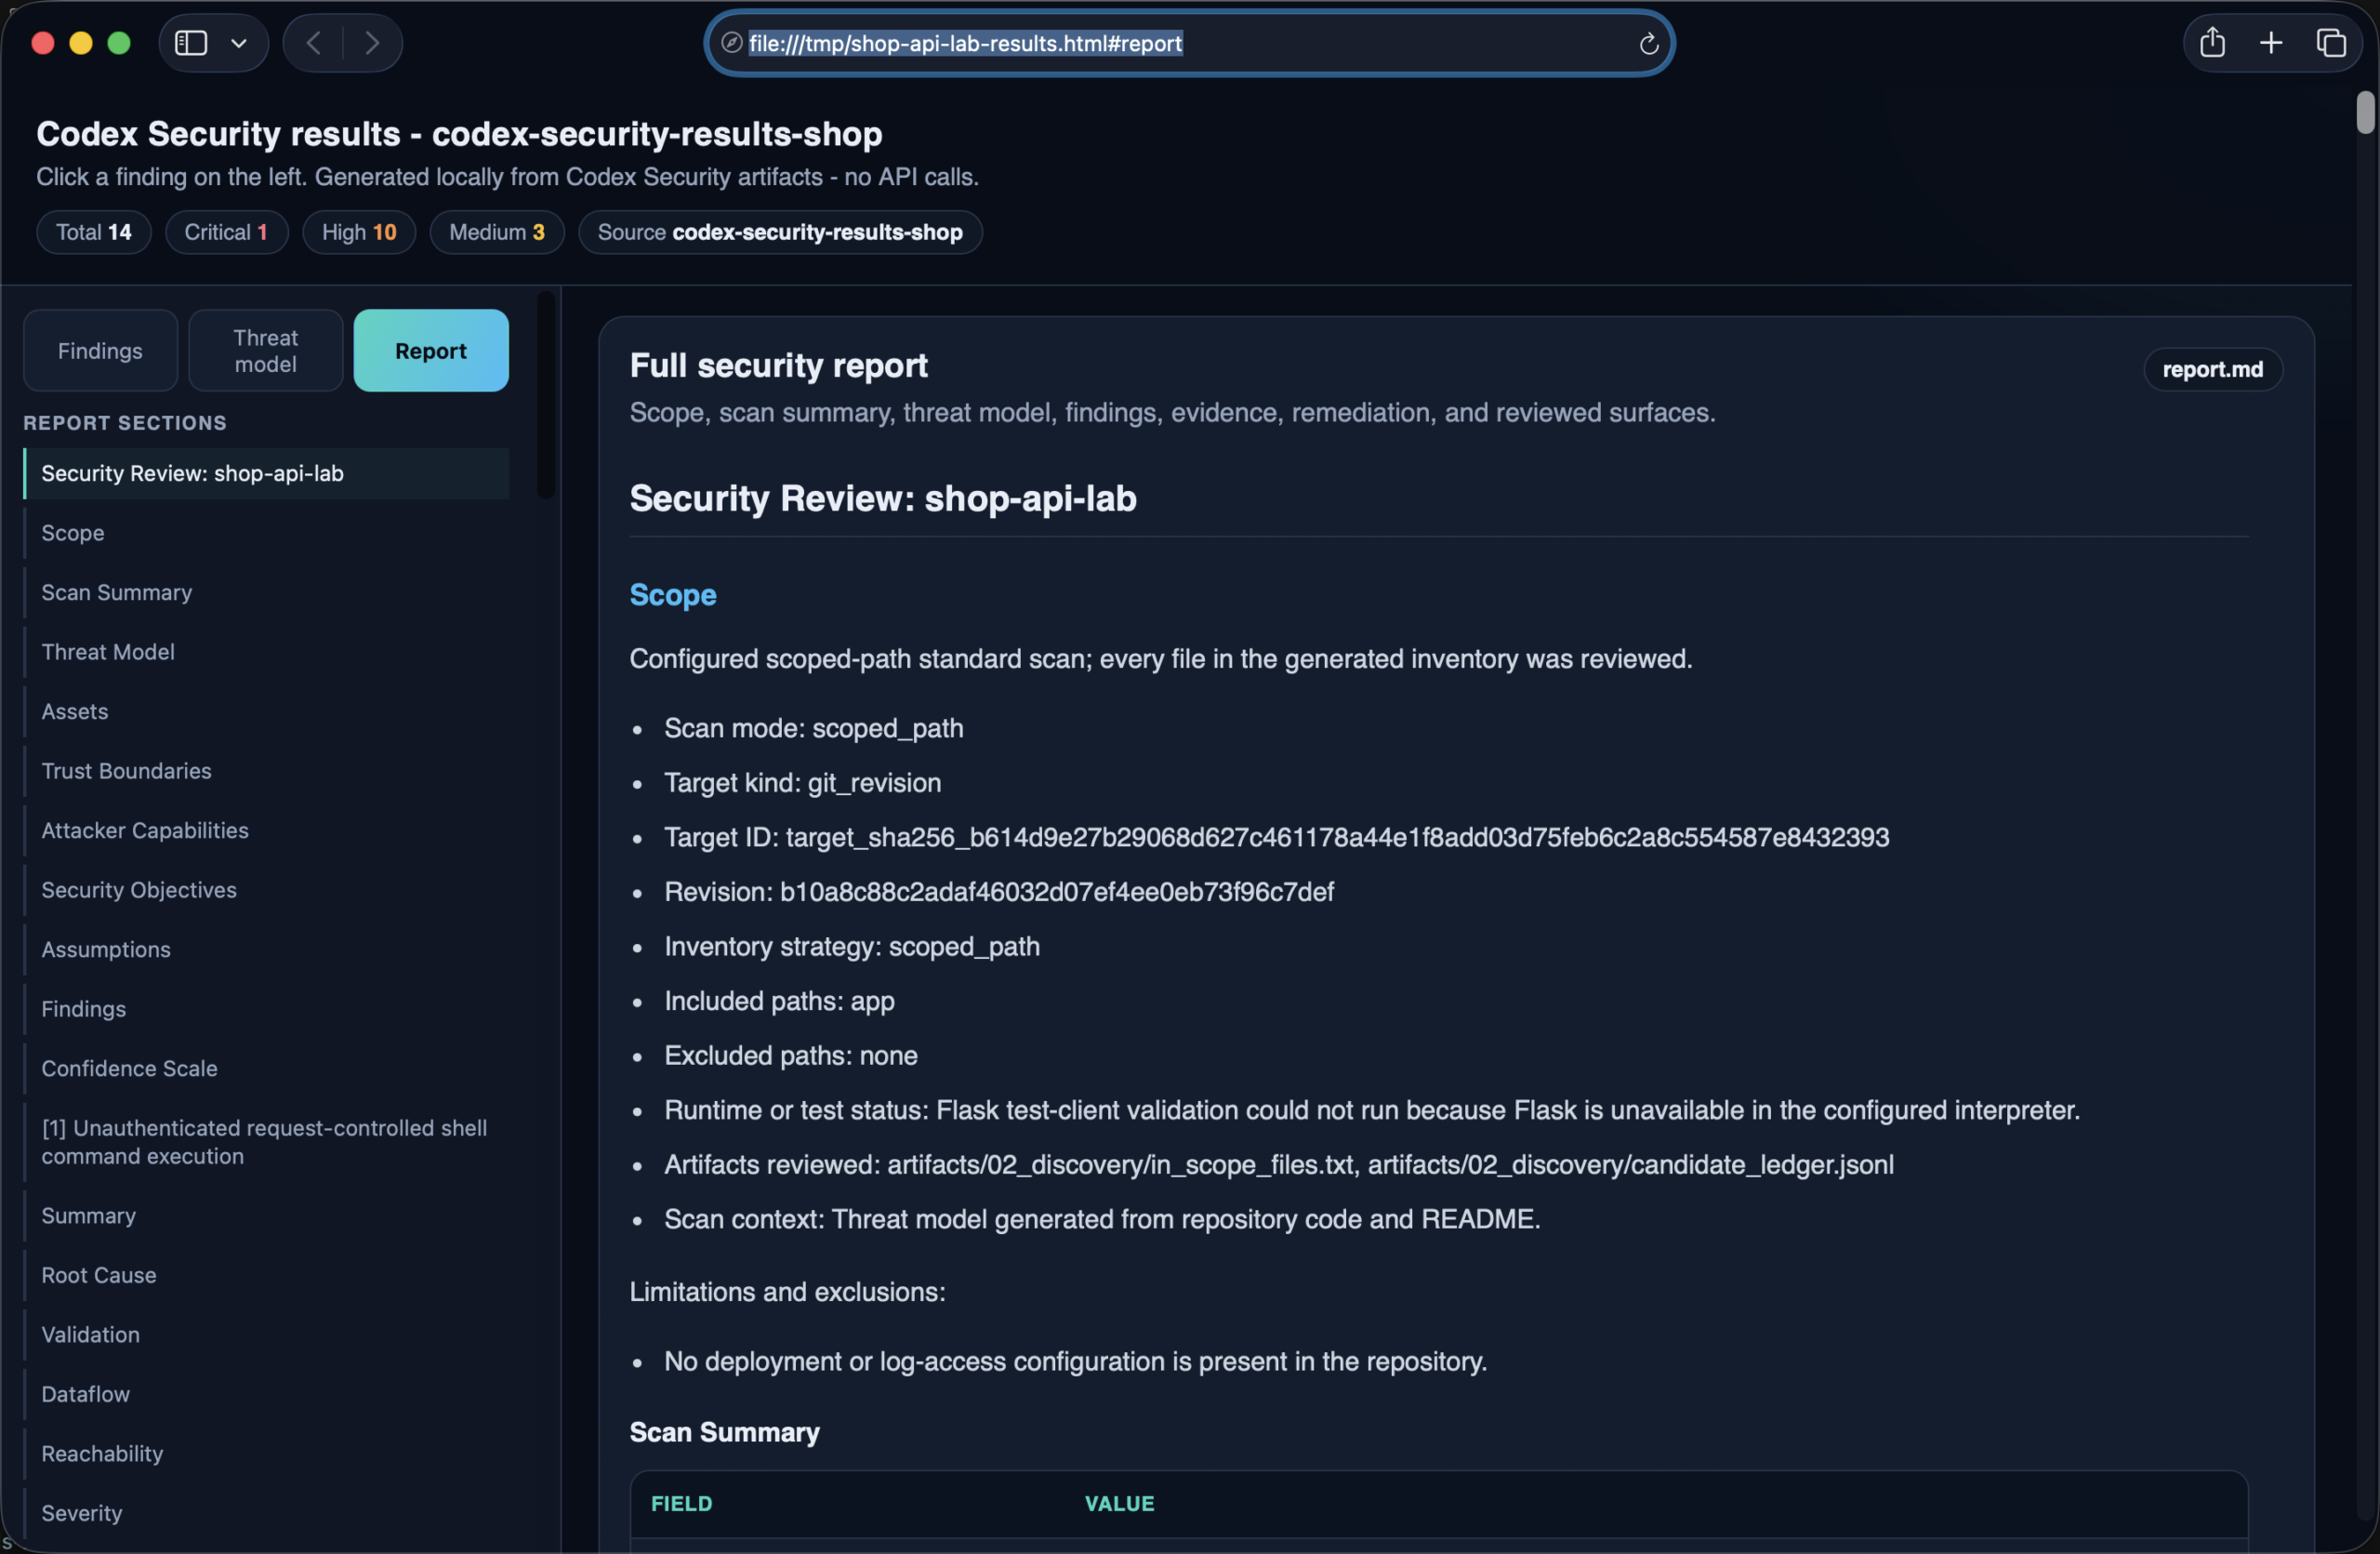
- Full Report tab with rendered headings, lists, inline code, code blocks, and tables
Threat Model tab
The Threat Model tab reads artifacts/01_context/threat_model.md and renders it as a proper document. The left sidebar becomes a section navigator for Overview, trust boundaries, attacker stories, and severity calibration.
Full Report tab
The Report tab renders the complete report.md, not just its opening lines. Markdown tables become scrollable HTML tables; finding headings, evidence blocks, severity rationale, remediation, tests, and reviewed surfaces remain navigable from the sidebar.
The script lives at tools/codex_security_results_html.py. Point it at any completed scan dir that has findings.json. Optional extras it will pick up: report.md and artifacts/01_context/threat_model.md.
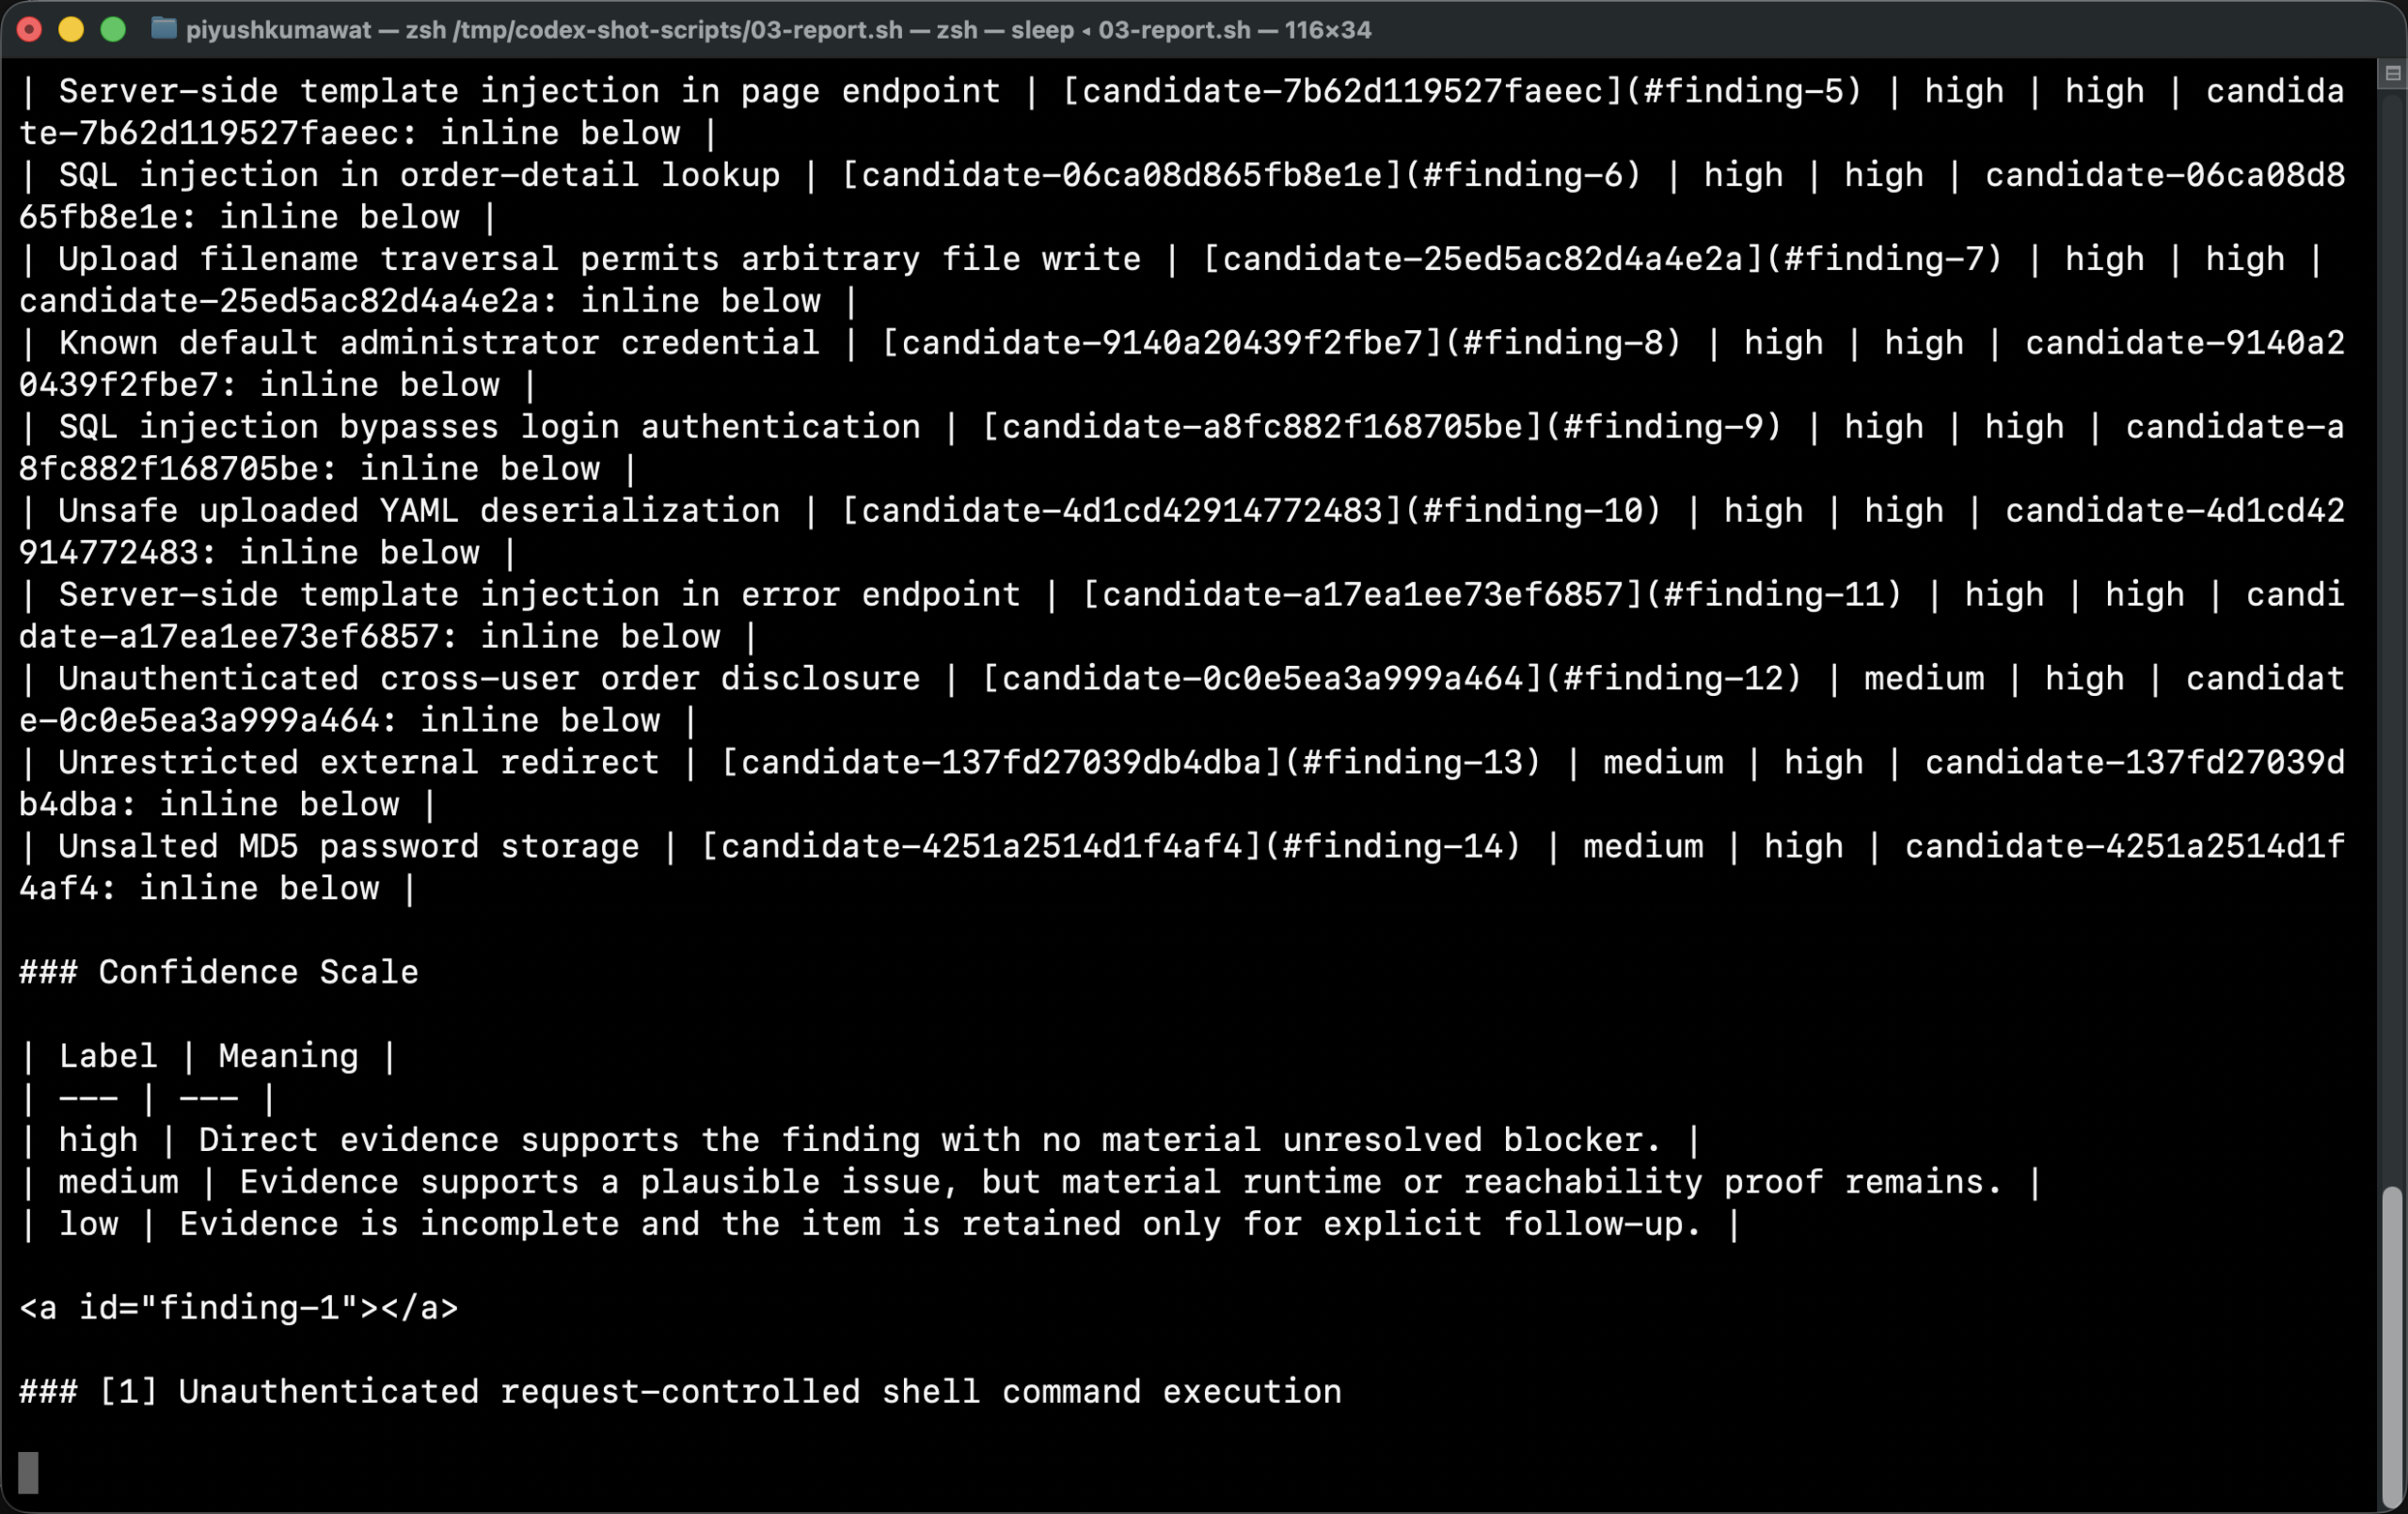
The 14 issues (this is the money section)
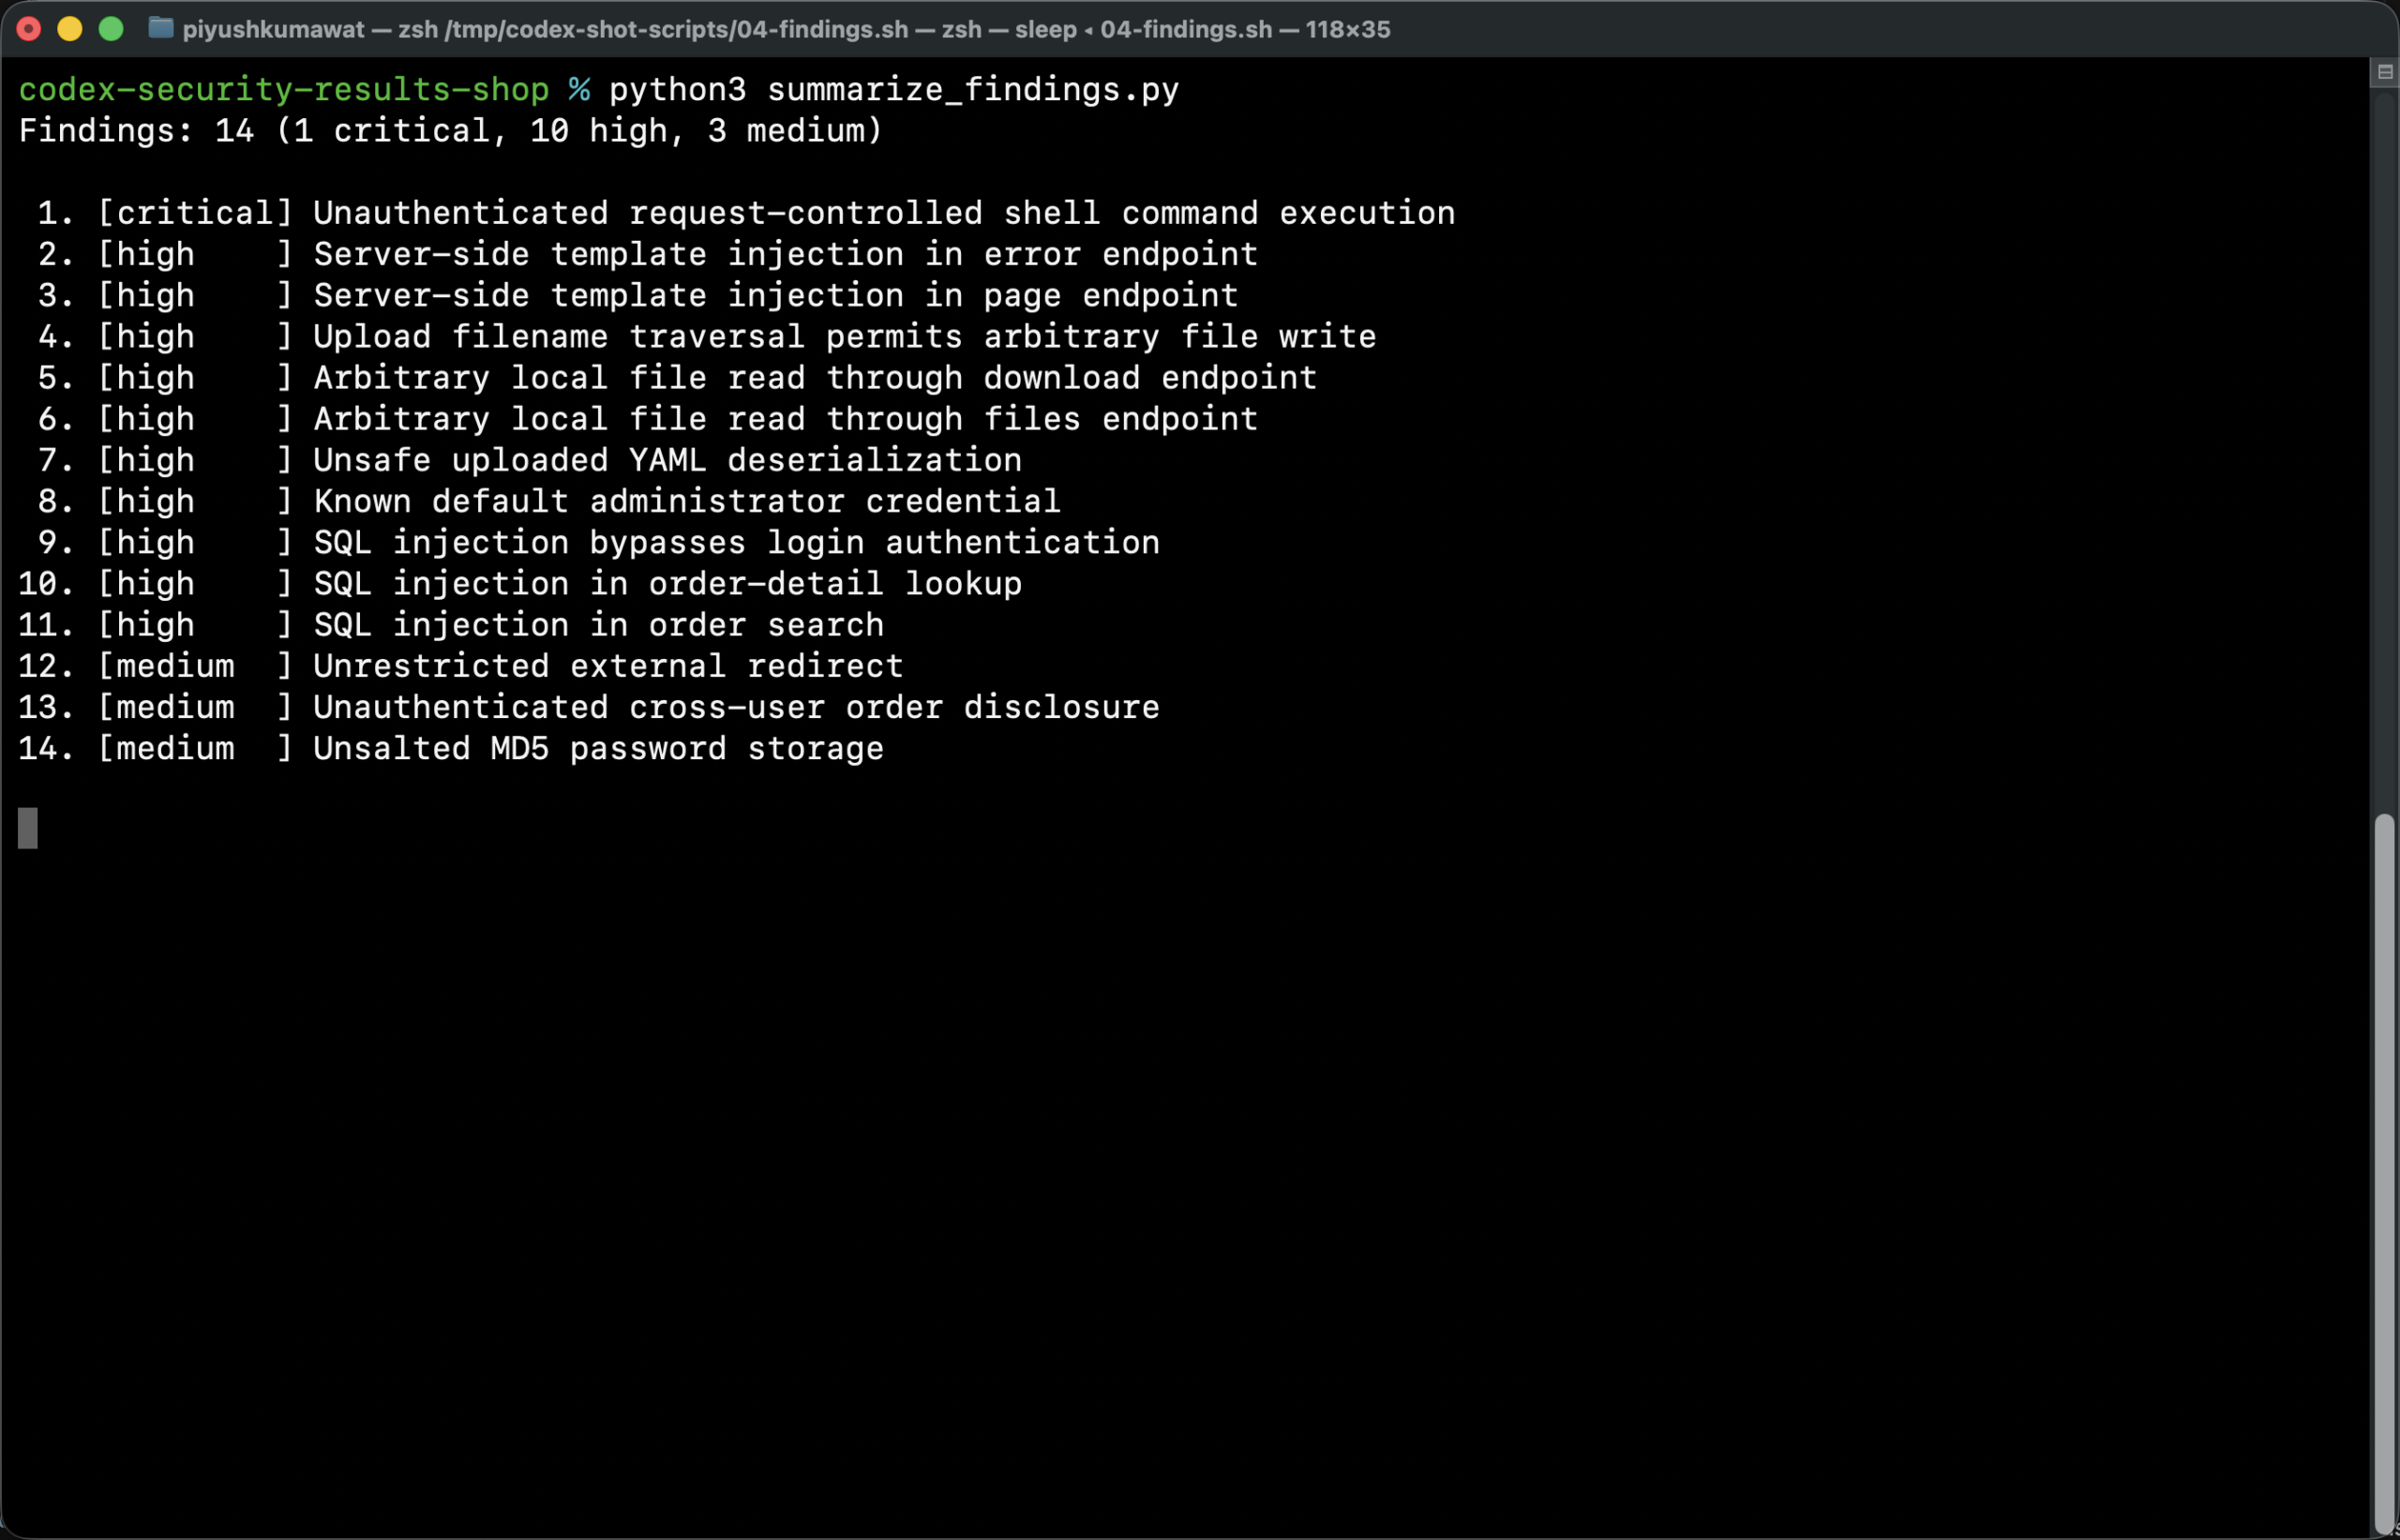
Here is the full list from the real run:
- Critical: Unauthenticated request-controlled shell command execution (
/api/admin/run) - High: SSTI in
/api/errorand/api/page - High: Upload filename traversal (arbitrary write)
- High: Arbitrary local file read via
/api/downloadand/api/files - High: Unsafe uploaded YAML deserialization
- High: Known default administrator credential
- High: SQL injection on login, order detail, and order search
- Medium: Unrestricted external redirect
- Medium: Unauthenticated cross-user order disclosure (IDOR-style)
- Medium: Unsalted MD5 password storage
Critical - shell as a service
@api.route("/admin/run")
def admin_run():
    cmd = request.args.get("cmd", "id")
    out = subprocess.check_output(cmd, shell=True, stderr=subprocess.STDOUT)
    return out
Codex did not stop at "shell=True is bad." It traced request -> command -> subprocess, called severity critical, and wrote remediation: remove shell from the HTTP route, authorize properly, use an allowlisted argv array.
High - SQL injection in three places
Login, order detail, and order search all compose SQL with f-strings. That is authentication bypass plus data disclosure. Remediation from the report: parameterized queries, password KDFs for login, bind search terms and escape LIKE wildcards.
# login
conn.execute(
    f"SELECT id, username, role FROM users WHERE username = '{username}' AND password = '{password}'"
)

# orders
conn.execute(f"SELECT ... FROM orders WHERE id = {order_id}")
conn.execute(f"SELECT ... FROM orders WHERE notes LIKE '%{q}%'")
High - filesystem and upload chaos
Two file-read endpoints take raw paths. Upload keeps attacker-controlled filenames and can traverse. YAML uploads go through yaml.load unsafely. That is classic "small internal tool" risk that becomes a breach when the service faces a network.
High - SSTI in HTML helpers
/api/page and /api/error build template source from query params, then call render_template_string. That is remote code execution class risk in Jinja, not "just XSS."
Medium - IDOR + open redirect + weak password storage
Orders are readable without ownership checks. Redirects accept any next URL. Registration stores unsalted MD5. Individually medium. Together they are how attackers chain from "interesting bug" to "account takeover."
The threat model it wrote
Before findings, Codex builds a threat model from repo evidence (artifacts/01_context/threat_model.md). For the shop API it named:
- Assets: credentials, JWT/Flask secrets, admin token, order records, filesystem, execution environment
- Trust boundaries: unauthenticated HTTP into route handlers, then into SQLite, filesystem, subprocess, YAML, and token processing
- Attacker capabilities: request bodies, query params, path values, headers, uploads, redirect targets
- Severity calibration: critical for request-controlled RCE, high for SQLi / arbitrary file read / unsafe deserialize / default admin creds, medium for IDOR / open redirect / weak hashing
That context is why the severity calls feel defensible instead of vibes-based. If you want a blank worksheet for your own design reviews, use the threat modeling template.
Remediation that is ticket-ready
Each finding ships remediation language you can paste into a ticket. Pair it with the security report templates when you need a full write-up, and the secure code review checklist when you verify the fix in source. Samples from this run:
- Shell: remove shell from the HTTP route; authorize with immediate denial; allowlisted argv only
- SSTI: pass values as template variables, never construct template source from input
- File read: fixed base directory + resolved-path containment (
send_from_directory) - Upload write: server-generated filenames; reject traversal after resolve
- YAML:
yaml.safe_loadonly - SQLi: bind parameters; use a password-hashing KDF for login
- Default admin: never seed a usable default password
- IDOR: authenticate and constrain lookups to the principal/tenant
- Redirect: allow only relative or validated same-origin destinations
- MD5: Argon2id / bcrypt / scrypt with per-password salt + migration
Why this tool is actually useful
- Volume with structure. 14 findings is a backlog, not a panic dump, because each one has path, severity, confidence, and fix guidance.
- Threat model first. Severity is grounded in assets and trust boundaries.
- Source-to-sink traces. Not lonely regex hits.
- Human + machine artifacts.
report.mdfor people,findings.json/ SARIF for automation. - Scopable spend. Path + effort +
--max-costmake AI AppSec usable in CI. - Honest coverage. Partial is called partial.
- Workflow beyond scan: validate, patch, findings triage, scan history, hooks, bulk-scan, MCP.
What lands on disk
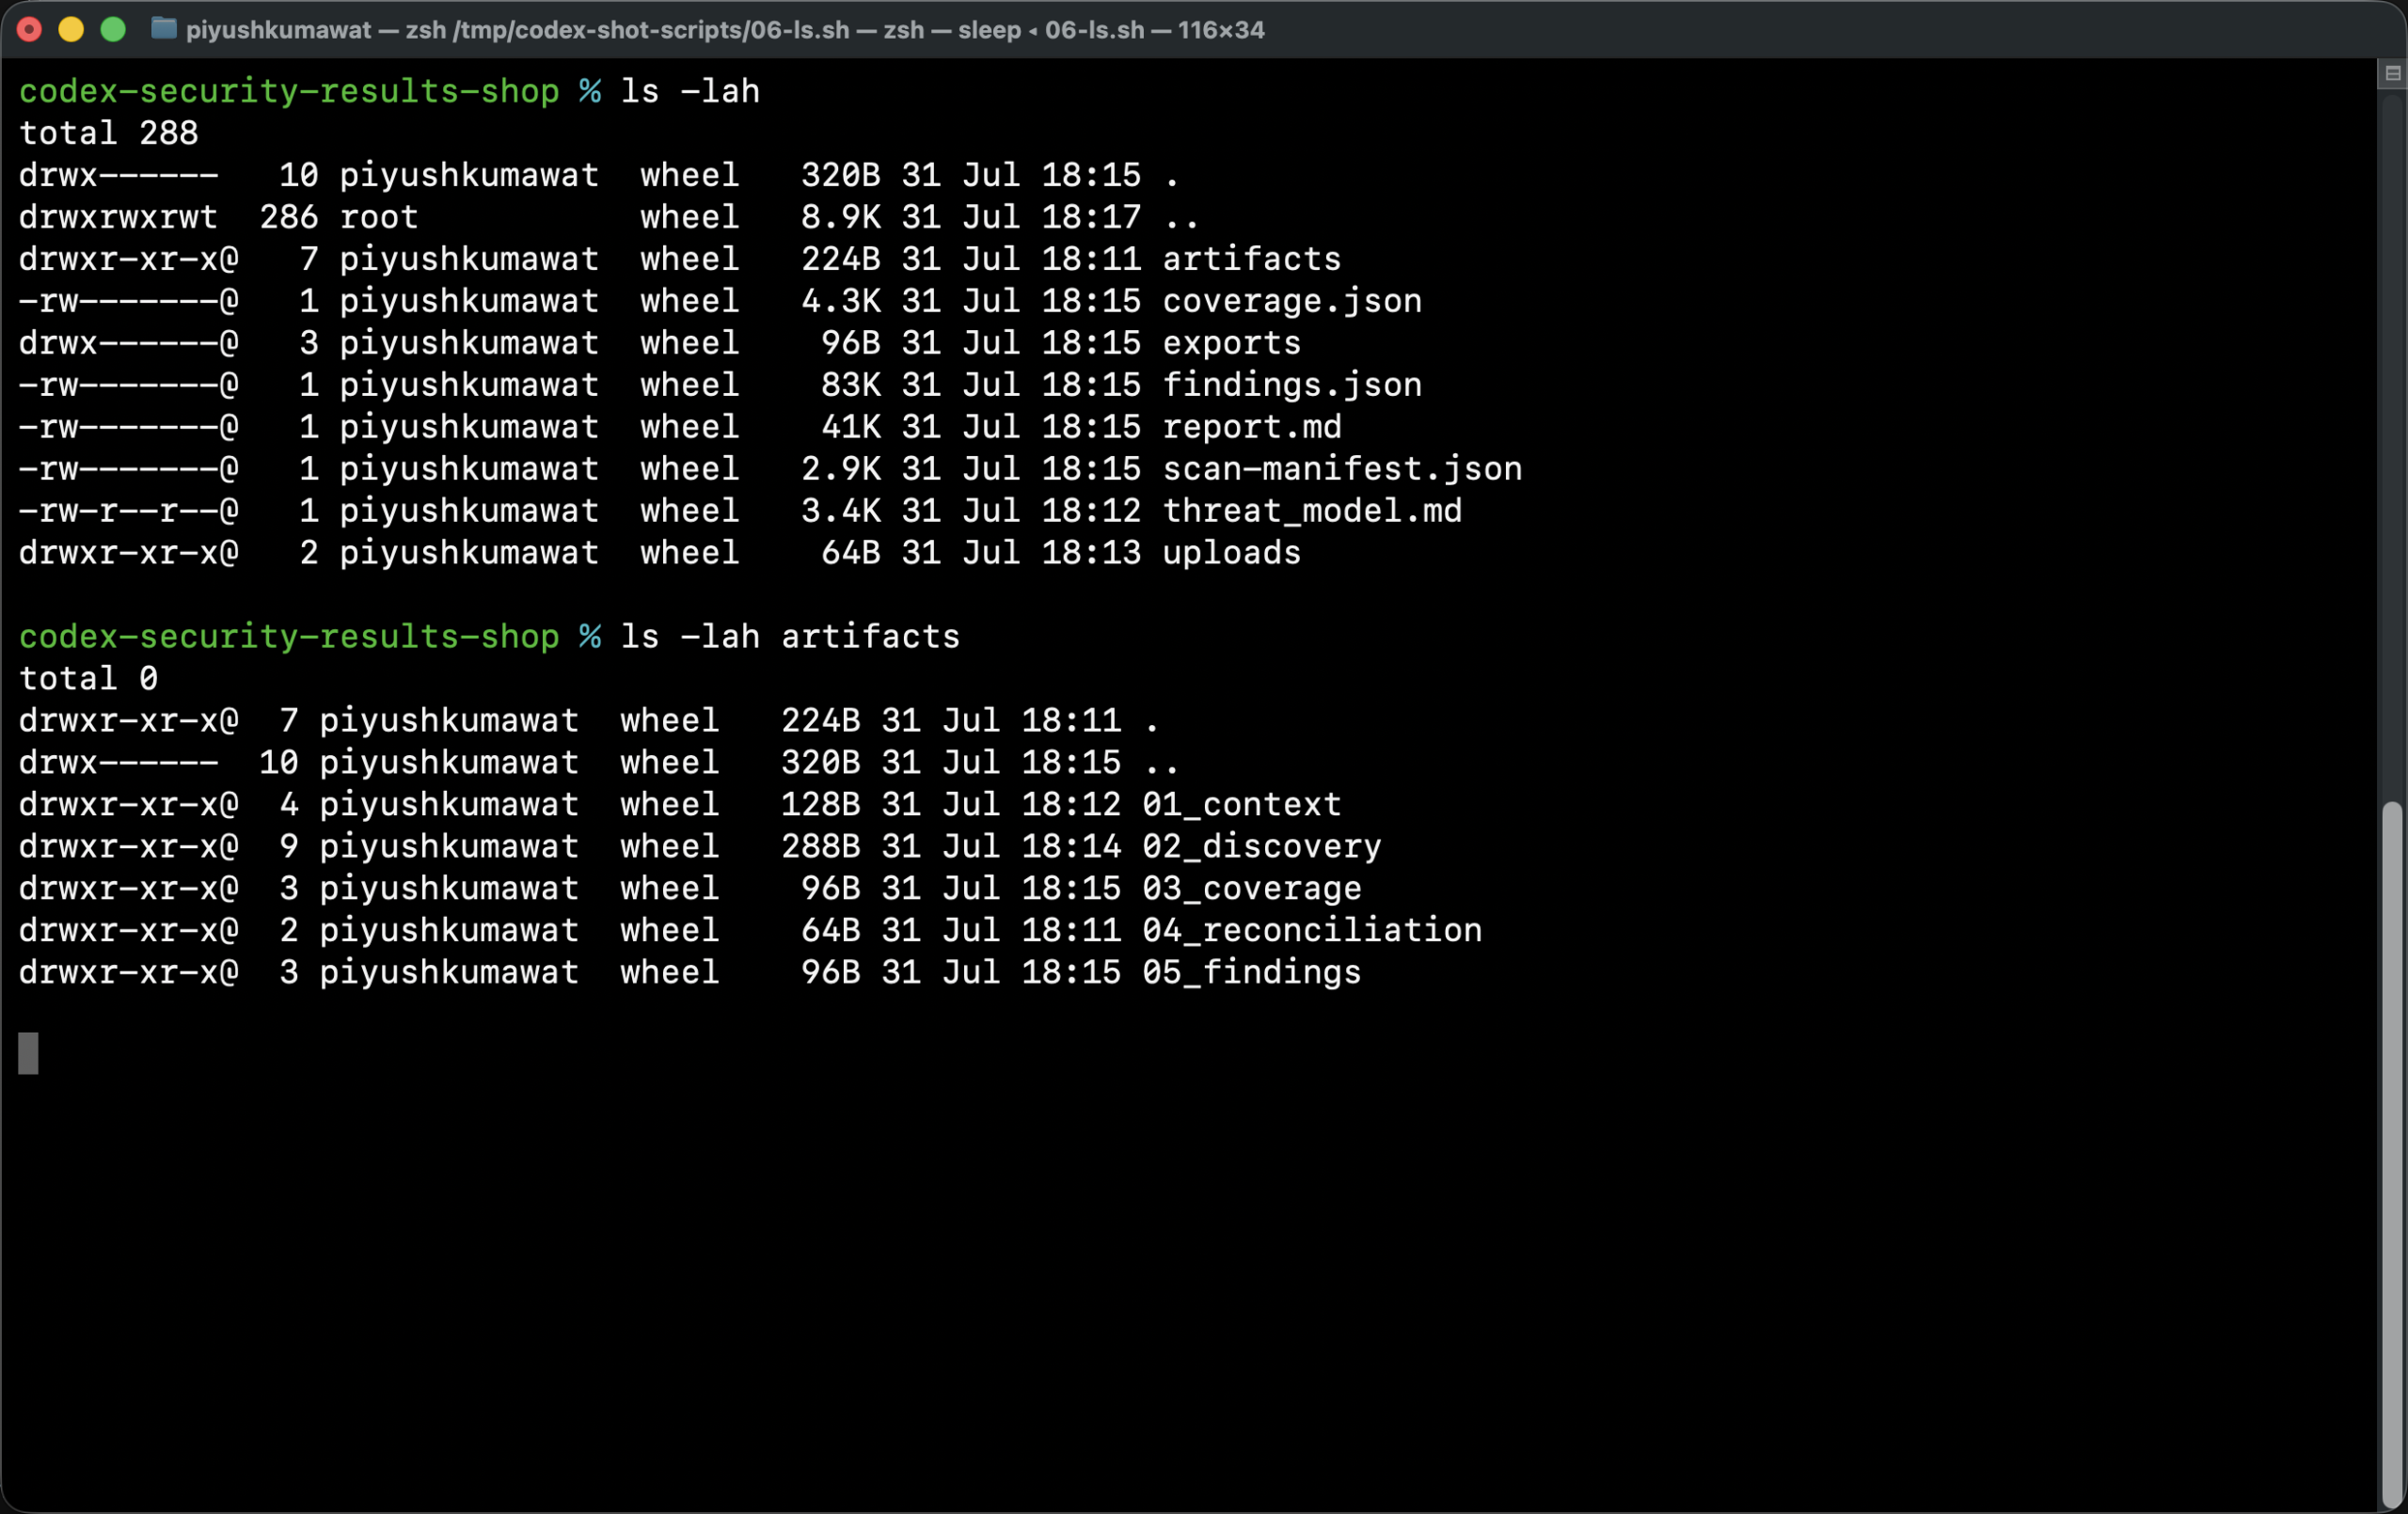
codex-security-results-shop/
├── scan-manifest.json
├── findings.json
├── coverage.json
├── report.md
├── artifacts/
│   ├── 01_context/threat_model.md
│   ├── 02_discovery/...
│   └── ...
└── exports/
Export to SARIF / JSON / CSV
Write exports outside the scan artifact names. Do not overwrite files inside the results dir:
mkdir -p /tmp/codex-exports-shop
chmod 700 /tmp/codex-exports-shop

cd /tmp/shop-api-lab
npx @openai/codex-security export /tmp/codex-security-results-shop \
  --export-format sarif \
  --output /tmp/codex-exports-shop/findings.sarif \
  --source-root /tmp/shop-api-lab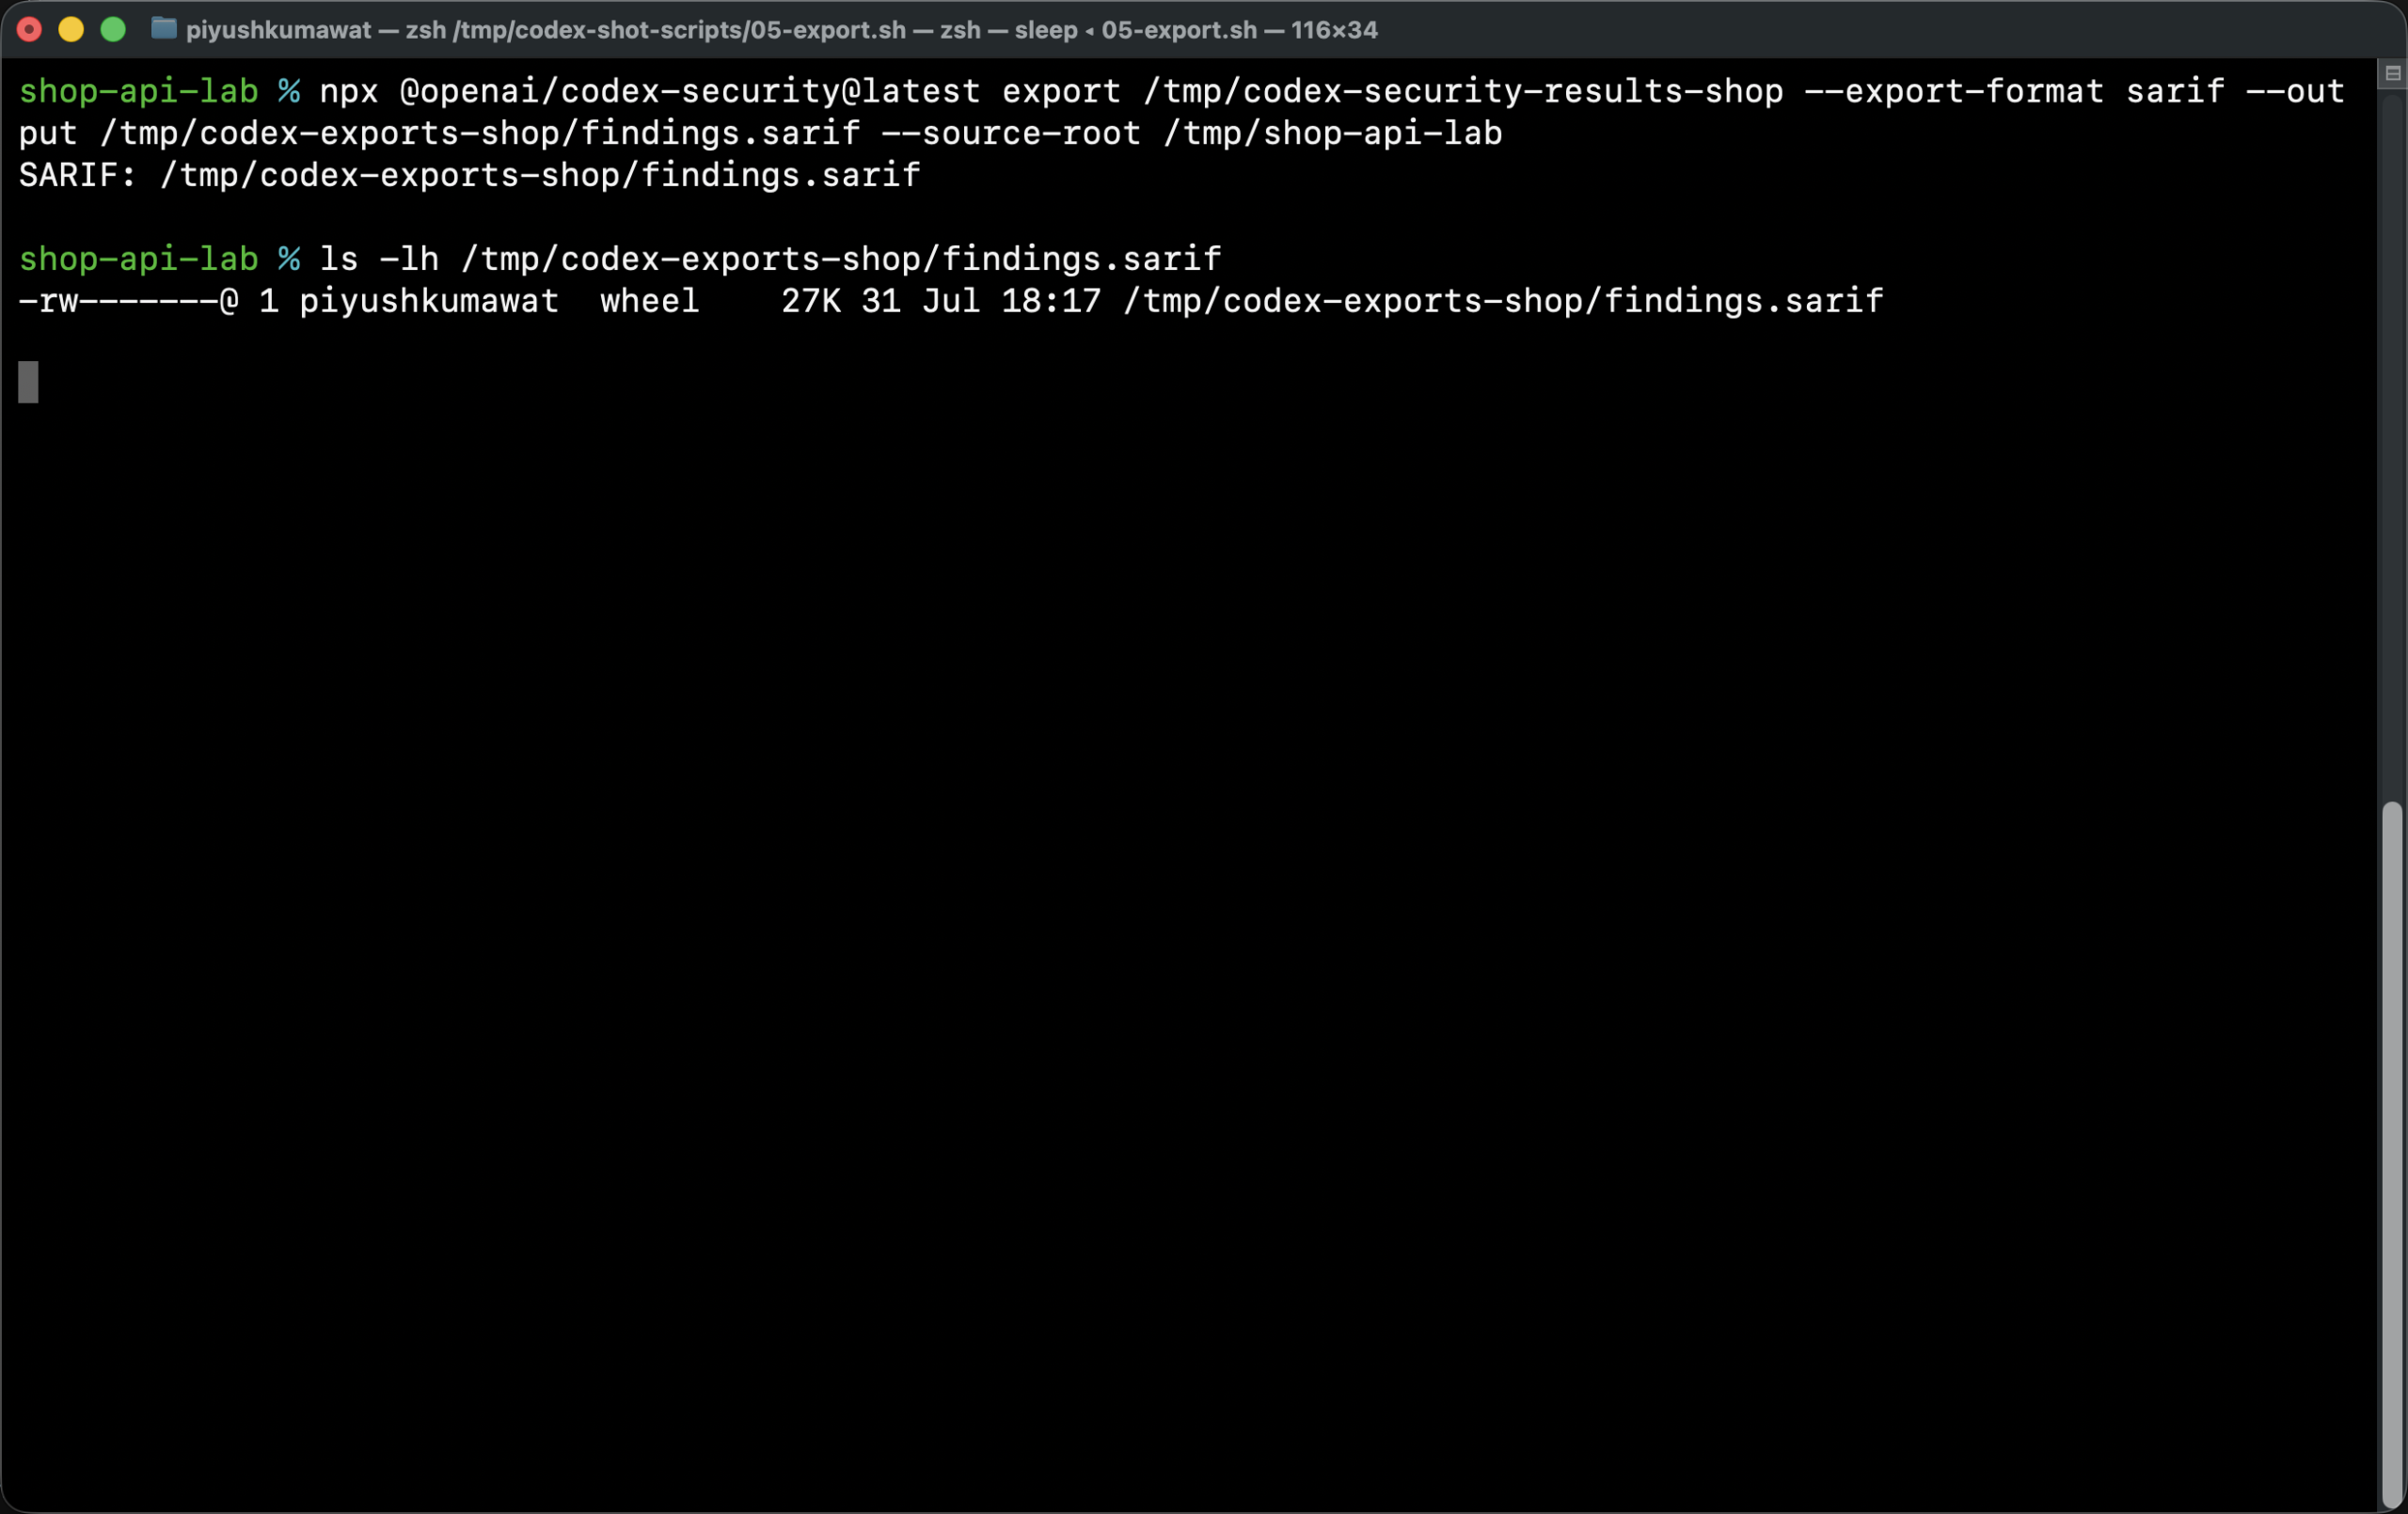
Beyond scan: the rest of the CLI
validate and patch
npx @openai/codex-security validate path/to/finding.txt --effort medium
npx @openai/codex-security patch path/to/issue.txt --effort medium
Re-check a candidate or ask for a fix proposal after human triage. Effort defaults to xhigh, so dial it down. Review every patch before merge.
findings / scans / hooks / bulk
findings false-positive- suppress known noisescans list|show|match|compare|rerun- history and driftinstall-hook --fail-on-severity high- pre-commit gatebulk-scan- GitHub discovery aftergh auth login, or CSV org campaignsmcp/skills- agent and IDE integrations- Codex Security cloud - scan GitHub repos connected in Codex environments
Scan modes you will actually use
- Path scan -
--path services/billing - Diff scan -
--diff origin/main --head HEAD - Working-tree -
--working-tree --base HEAD - Deep mode - broader review on repo/path only
- Knowledge base - repeated
--knowledge-basefor policies/threat models
Cost estimate (from my runs - estimate only, not official)
Important disclaimer: the numbers below are an estimate from scans I ran myself with gpt-5.6-terra and --effort medium. They are not an official OpenAI price list, not a guarantee, and not accurate for every repo. Model defaults, effort, path size, deep mode, retries, validate/patch, and pricing changes can all move the bill a lot. Treat this as a planning ballpark only. Always set --max-cost and watch the live estimate.
# Cost estimate (from my runs - estimate only, not official)
# settings: gpt-5.6-terra + --effort medium
#
# tiny 3-route Flask demo   (~180s, 3 findings)     ~ $1.50
# shop-api-lab /app path    (252s, 14 findings)     ~ $1.64
# we45 Vulnerable-Flask-App (~390s, candidates drop)~ $4.20
#
# planning ballpark:
#   small path / PR surface  ~ $1-$3   (--max-cost 5)
#   one service path         ~ $2-$8   (--max-cost 8 or 10)
# default sol + xhigh/deep much higher - raise carefully| What I scanned | Scope / settings | What happened | Estimated cost (CLI) |
|---|---|---|---|
| Tiny 3-route Flask demo | --path src, terra, medium, max-cost 5 | 3 findings, coverage complete, ~180s | ~$1.50 |
shop-api-lab (multi-route shop API) | --path app, terra, medium, max-cost 8 | 14 findings (1 crit / 10 high / 3 med), partial coverage, 252s | ~$1.64 |
| we45 Vulnerable-Flask-App | --path app, terra, medium, max-cost 8 | ~14 candidates found, then many dropped as malformed; 0 reportable | ~$4.20 |
My rough planning ranges from that analysis (again: approximate estimate, not accurate for everyone):
- Small path / PR-sized surface (terra + medium): about $1-$3. Cap with
--max-cost 5. - One realistic service path with several routes/files: about $2-$8. Cap with
--max-cost 8or10. - Default
gpt-5.6-sol+xhigh/ deep / full-repo: can climb much faster. Start lower, then raise deliberately. - Retries and dead ends cost money too. The we45 run burned ~$4 without a clean reportable finding set.
validate,patch, andbulk-scanspend additional tokens on top ofscan.
Practical rule: dry-run first, set --max-cost, prefer --path or --diff, and only bump model/effort after one cheap pass looks useful.
Connect GitHub and scan from there
You do not have to stay on a local checkout forever. Codex Security can work against GitHub-connected repositories in two useful ways.
Codex Security cloud (connected GitHub repos)
If your workspace has Codex Security cloud access, connect the GitHub repo in Codex environments, then create a security scan against that connected repository and branch. Cloud can backfill commit history and keep scanning as new commits land. Official setup: Codex Security cloud setup.
CLI GitHub discovery with bulk-scan
From the CLI, sign in to GitHub first, then let Codex discover repos from your account or org:
gh auth login

# interactive discovery from GitHub account / org
npx @openai/codex-security bulk-scan

# or pin exact repos + revisions with a CSV campaign
npx @openai/codex-security bulk-scan repositories.csv \
  --output-dir /tmp/codex-bulk-results \
  --workers 4 \
  --model gpt-5.6-terra \
  --effort medium
Interactive discovery excludes archived repos and forks, asks you to confirm before scanning, and can save the selected set to a CSV. For GitHub Enterprise Server, use gh auth login --hostname ... and set GH_HOST / CODEX_SECURITY_GIT_HOST as documented. Details: bulk scans docs.
For private repos in CI or containers, provide GH_TOKEN or GITHUB_TOKEN plus your OpenAI auth. Keep result directories chmod 700 and outside the repos you scan.
A CI-shaped recipe
set -euo pipefail
# CI: put the OpenAI API key in the job secret store, then:
export OPENAI_API_KEY="${OPENAI_API_KEY:?missing OPENAI_API_KEY}"

REPOSITORY="$PWD"
SCAN_DIR="$(mktemp -d /tmp/codex-security-results.XXXXXX)"
EXPORT_DIR="$(mktemp -d /tmp/codex-exports.XXXXXX)"
chmod 700 "$SCAN_DIR" "$EXPORT_DIR"

npx @openai/codex-security@latest scan "$REPOSITORY" \
  --diff origin/main \
  --head HEAD \
  --auth api-key \
  --model gpt-5.6-terra \
  --effort medium \
  --max-cost 5 \
  --output-dir "$SCAN_DIR" \
  --fail-on-severity high \
  --json

npx @openai/codex-security export "$SCAN_DIR" \
  --export-format sarif \
  --output "$EXPORT_DIR/findings.sarif" \
  --source-root "$REPOSITORY"
In CI, --auth api-key is useful because it forces the API-key path and avoids interactive ChatGPT login. Locally, if login status is already OK, you can omit --auth.
Command cheat sheet
| Command | Use it for |
|---|---|
login / logout | ChatGPT credentials |
info | Versions, default model, next step |
scan --dry-run | Validate inputs for free |
scan | Repo / path / diff review + threat model |
export | SARIF / CSV / JSON (outside scan artifacts) |
validate / patch | Recheck and propose fixes |
findings false-positive | Suppress known noise |
scans list/show/match/compare/rerun | History and drift |
install-hook | Pre-commit gate |
bulk-scan | GitHub discovery / org-wide CSV campaigns |
mcp / skills | Agent / IDE integrations |
| Codex Security cloud | Scan GitHub repos connected in Codex environments |
Related reading
- API Security Checklist - authorization, injection, and business-logic checks for the same class of Flask/API bugs.
- WSTG Testing Methodology - map Codex findings back to a repeatable testing method.
- AI, LLM, MCP and Agent Security - deeper AI/AppSec testing notes on Security Cipher.
- How I Would Hack Your Startup in 24 Hours - attacker workflow that pairs well with automated source review.
FAQ
Does this replace Semgrep / CodeQL?
No. Keep deterministic SAST for coverage and policy. Use Codex Security when you want reasoning over a scoped surface or PR diff.
How much should I budget?
From my own runs only (estimate, not an official figure): start around --max-cost 5 for a small path and --max-cost 8 for a single service path on terra + medium. My shop API landed near $1.64; a noisier public demo hit ~$4.20. Defaults and deep/full-repo scans can cost much more. Do not treat these numbers as accurate for your codebase.
Can I scan GitHub repos directly?
Yes. Use Codex Security cloud with a connected GitHub repository, or use CLI bulk-scan after gh auth login to discover account/org repos interactively. For repeatable campaigns, feed a CSV of repository + revision.
Will it hallucinate or drop findings?
Sometimes. On we45, candidates existed but malformed evidence IDs got skipped. On shop-api-lab, all 14 survived with high confidence. Always read report.md and coverage.json before you page anyone.
What to do on Monday
- Install
@openai/codex-security@latestand runinfo. - Login or set an API key. Create a chmod 700 output dir under
/tmp. - Dry-run one hot path with terra + medium effort.
- Run the live scan with
--max-cost 8. Readreport.mdand the findings table. - Export SARIF into whatever already owns your vuln backlog.
- If you live in GitHub, connect the repo in Codex cloud or try
gh auth login+bulk-scan. - Add a PR diff scan once the noise is tolerable.
Official docs: CLI quickstart, CLI reference, package @openai/codex-security, repo openai/codex-security.
If you only remember one thing: scope the scan, cap the cost, read the threat model, then verify the critical path by hand. That is how this tool stops being a demo and starts being AppSec leverage.