
This article aims to be a comprehensive guide on how you can create bootable USB flash drive using simple commands. In this article, I will show you a method to create the bootable flash drive using the DIKPART utility which comes with the windows operating system. So Let’s Get Started.
Introduction
A bootable USB is a USB flash drive that contains a special file called a bootloader. A bootloader is a small piece of software that tells your computer how to start operating systems and programs stored on the USB. When we create a bootable pen drive It allows us to install Operating System onto our machine without having to first run an existing operating system. So, Today I am going to share a trick on how to create bootable USB drives. After Reading this Post you can easily create a bootable USB/Pendrive.
The bootable USB drive can be created in 2 methods, the first one is manually using a Command prompt or the second is using the Software.To create a bootable USB drive manually, we will use the Command Prompt. Here are steps by step to create a bootable USB drive.
Requirements :
- Windows Operating System
- A Pendrive 4GB or 8Gb minimum for 32 Bit and 64 Bit respectively
- A working computer for making bootable USB
Using DISKPART Command
To create a bootable USB drive manually, we will use the Command Prompt in Windows. Here are steps to create a bootable USB drive as the Windows Installation Media. For This we require at least 4 GB of minimum capacity, Larger capacity is better.
Step 1. Insert your USB Flash Drive into your Running Computer.
Step 2. Open Command Prompt. Search cmd in the search box in the Windows start menu. Then cmd appears and Then right-click on it and select Run as administrator.
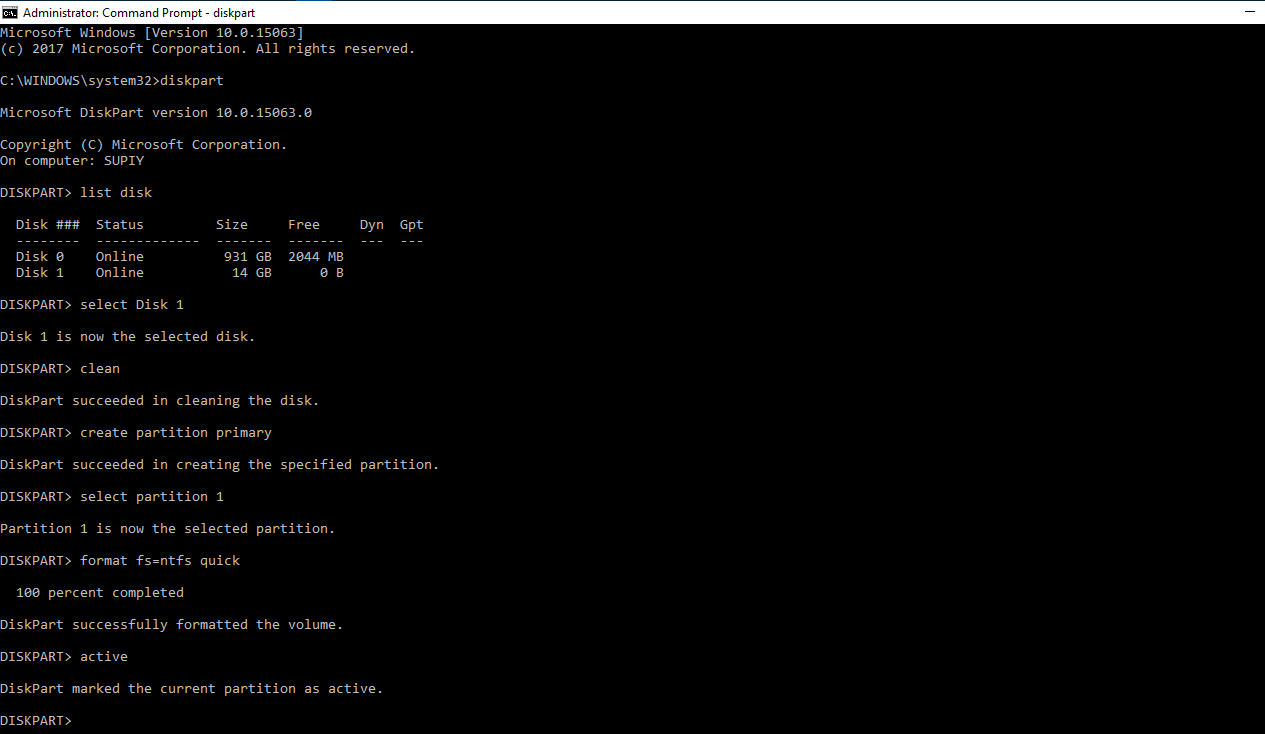
Step 3. Type DISKPART. wait for the program until the DISKPART program run.
Step 4. Type list disk to view active disks on your computer and hit Enter. There would be seen as Disk 0 for Hard Drive and Disk 1 for your USB Flash Drive with its total capacity.
Step 5. Type select disk 1 to use disk 1 in to proceed to the next step.
Step 6. Type clean and hit Enter. It would delete all the data from the USB flash drive.
Step 7. Type create partition primary and hit Enter. it will create a new partition in USB Flash Drive.
Step 8. Type select partition 1 and hit Enter. It will select the partition that we create by the above command.
Step 9. Type format fs=ntfs quick. It will format the partition.
Step 10. Type active and then hit Enter.
Step 11. Type exit and hit Enter.
That’s it now your USB Flash Drive is Bootable and now you can copy the files and use the USB Flash Drive For installation On the Computer.
Commands used
> diskpart
> list disk
> select disk 1
> clean
> create partition primary
> select partition 1
> format fs=ntfs quick
> active
Conclusion
So, this guide is about how you can create a bootable USB drive using the command prompt. With the above guide, you will be able to create a bootable flash drive without any third-party software. Hope you like this cool trick, do share this trick with others too. Leave a comment below if you have any related queries about this.