Welcome to an all-inclusive tutorial covering the seamless integration and configuration of the ngrok tool within your system. Within these pages, you’ll discover a straightforward technique to activate port forwarding sans a router, all thanks to the ingenious ngrok tool. Let’s dive right in!
Introduction
Discover ngrok, the open-source tool designed to effortlessly unveil localhost ports to the expansive realm of the Internet. By ingeniously channeling TCP/IP traffic through a secure HTTPS connection via its encrypted proxy server, ngrok enables the exposure of any designated port on your computer sans the necessity of root privileges. Seamlessly unveil your local web server to the online domain by informing ngrok of the port your server is tuned to.
Easy to Install and Use
To get started, ensure you grab the newest ngrok edition from their official site. After downloading, use your preferred unarchive (I suggest 7zip) to extract the files. Open the folder where you unpacked the files, and launch the program. Just track the on-screen instructions, and you’ll have it installed hassle-free!
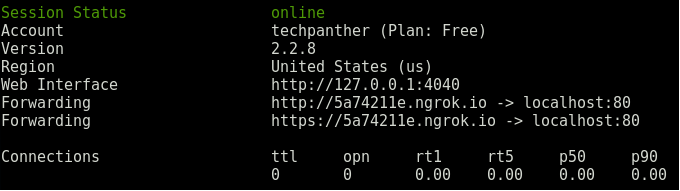
$ ngrok HTTP 80
When you start ngrok, it will display a UI in your terminal with the public URL of your tunnel and other status and metrics information about connections made over your tunnel.
Configure ngrok
After installing ngrok, navigate to the directory containing the ngrok binary. Open the configuration file at config.json in your preferred text editor. Edit the following settings:
- `http_port` – The port number you want to expose.
- `https_port` – The secure port number you want to use.
- `external_interface` – The IP address you want to bind to.
- `internal_ipv4` – The IPv4 address you want to bind ngrok to.
- `external` – Whether you want to allow external connections. If set to true, ngrok listens on all interfaces. If false, only listen on the specified interface.
- `auth_token` – An optional authentication token. If not provided, ngrok uses the default auth token.
Installing your Authtoken
$ ngrok authtoken <YOUR AUTHTOKEN>
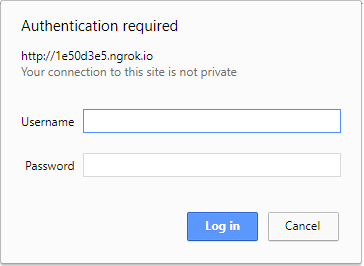
Password protecting your tunnel
$ ngrok http -auth="username:password" 80
It has a dashboard

You can replay requests
Conclusion
So, this guide is about installing and configuring the ngrok tool. Now using the above steps you can enable the port forwarding on your local system without a router. Hope you like this cool trick, do share this trick with others too. Leave a comment below if you have any related queries about this.