This article is a part of the Windows Server 2016 Tutorials series. In the previous article, we discussed about DNS and how to install DNS on Windows Server 2016 . mentioned. Now we’ll move forward and see the configuration of DNS and we will and create Primary Zones. Therefore Let’s Start. Before these keep in mind that your system has put in with DNS Role.
Introduction
DNS stands for Domain Name System. DNS is a protocol that translates human-friendly domain names into IP addresses. You may have heard of DNS servers before. If you type “what’s my ip address?” into Google, you’ll get results that tell you what your computer’s external IP address is. Your ISP (Internet Service Provider) gives you an IP address when you sign up for internet service. That’s how they know where to send your data.
The DNS system works similarly. When you type in a web address, like “www.google.com”, your browser sends out a request to find the website. The DNS system receives the request, looks up the IP address associated with the domain name, and then returns the correct information back to your browser. Let’s See how Configure DNS Role in Windows Server 2016. For this, we want to follow the subsequent Steps.
Configuration of DNS in Windows Server 2016
In the Below Steps, we’ll Configure DNS by making the New Zones. We will create a primary zone as a result of, by default, they are not having any zones so as to manage the records. We will create new Primary zones in Forward Lookup Zone and Reverse Lookup Zone.
Creating Primary Zone in Forward Lookup Zone
Step 1. Open “Server Manager Console”, From the Dashboard, click on “DNS” > Right Click on “Server IP Address” and choose “DNS Manager”.

Step 2. Here within the Screenshot, you’ll be able to see the “DNS Manager” Window. Now we will create New Primary Zone in Forward Lookup Zone. Right, Click on “Forward Lookup zone” > Click on “New Zone…”

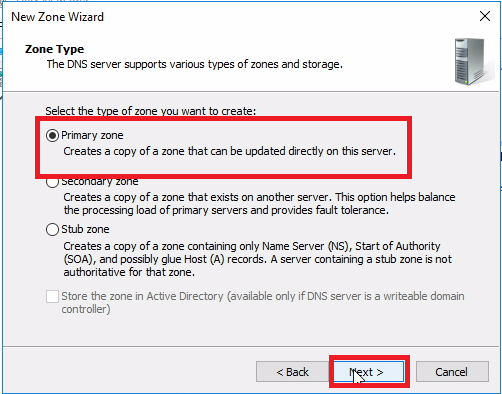
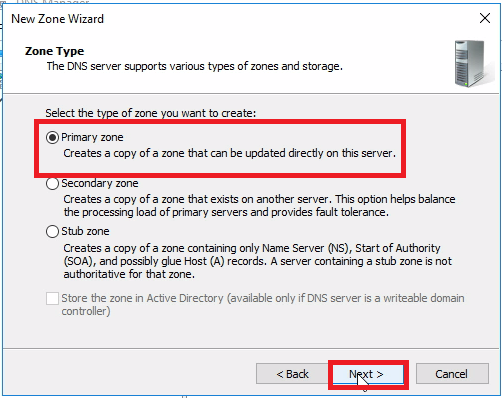
Step 3. A New zone Wizard will open. Choose “Primary zone” and click on “Next”.
Step 4. Here you have to enter the name of the Primary zone where you would like to manage the records. Just Enter the “Zone Name” (Like google.com.in ) and click on “Next”.

Step 5. Select “Create a New file with this file name” to create a new zone file. Click on “Next”.

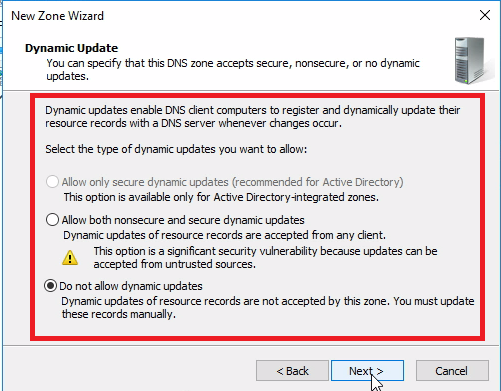
Step 6. Here you’ll be able to specify that this DNS zone accepts secure, nonsecure, or no dynamic updates. If you want to allow both nonsecure and secure dynamic updates, Select “Allow both nonsecure and secure dynamic updates” as shown below and Click on “Next”.
Step 7. Now you will see a Confirmation Dialog Box with the Settings you have Selected. Click on “Finish”.

Creating Primary Zone in Reverse Lookup Zone
Step 1. Open “Server Manager Console“, From the Dashboard, click on “DNS > Right Click on “Server IP Address” and Select “DNS Manager”.
Step 2. Now we will create a New Primary zone in Reverse Lookup Zone. Right, click on “Reverse Lookup zone” > Click on “New Zone …”

Step 3. A New zone Wizard will Open. Select “Primary zone” and click on “Next”.
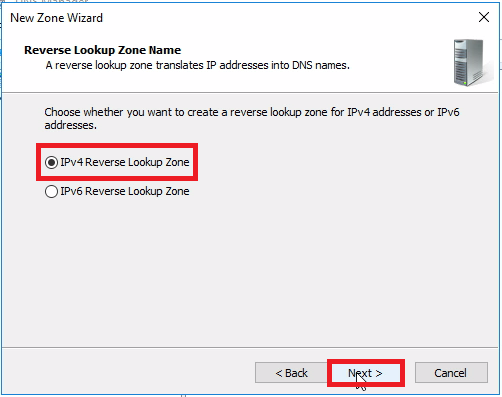
Step 4. Select “IPv4 Reverse Lookup Zone” and Click on “Next”.
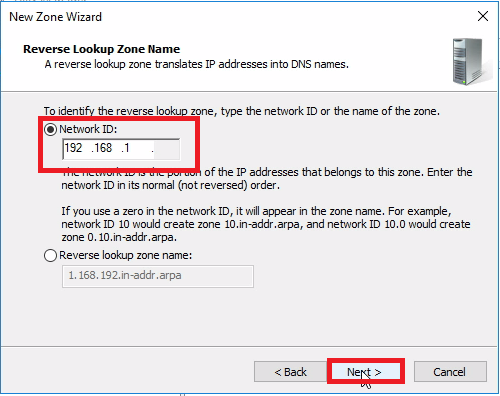
Step 5. Here we have to “Enter the First three Octate of the IP Address”. (If your Server IP Address is 192.168.1.10 then here type 192.168.1 ) Click on “Next”.
Step 6. Select “Create a New file with this file name” to create a new zone file. Simply click on “Next”.

Step 7. Here you’ll be able to specify that this DNS zone accepts secure, nonsecure, or no dynamic updates. If you want to allow both nonsecure and secure dynamic updates, choose “Allow both nonsecure and secure dynamic updates” as shown below and click on “Next”.

Step 8. Now you will see a Confirmation Dialog Box with the Settings you have Selected. Click on “Finish”.
Congratulations! finally, we have Successfully configured DNS Server in our Windows Server 2016 Machine and the DNS service is running on the server. In the next Part, we will Add Records on Windows Server 2016 Machine.
Download the “Tutorials for Windows server” Android application from the play store now so that you can have access to all the information related to Windows Server.
Conclusion
So this guide is all about the Configuration of DNS in the Windows Server 2016 Machine. With these Steps, you can create a forward lookup zone and reverse lookup zones from the DNS manager. Hope you like this cool trick, do share this trick with others too. Leave a comment below if you have any related queries about this.