
This article is a part of the Windows Server 2016 Tutorials series. In the two previous articles, we have discussed What is DNS (Domain Name System) and its installation and Configuration of DNS in Windows Server 2016. Using these two Articles you can Successfully Install and Configure the DNS server on your Windows Server Machine. Now we will move forward and see how to add DNS records on Windows Server 2016. So let’s get started. Before these remember that your system Should be set up with DNS.
Introduction
As we all know, in DNS we can Add records according to our needs. In most cases, the DNS server is configured to automatically update its records. As per the Server’s Configuration, all the Client computers that are members of an existing domain will automatically register their computer names along with their corresponding IP addresses with the DNS server.
Sometimes in an organization administrators do not allow the Client Computers to automatically update DNS records. When the administrator set this type of Configuration then the administrator has to manually add or alter the DNS records in the DNS Server for the Name resolution. Using this, security is also maintained. If you also have configured your DNS Server with this type of Configuration, then you can follow the below steps given in this tutorial that how you can manually add a DNS host Record in the DNS Server.
Add DNS A Record
Let’s See how you can add a New DNS Record on Windows Server 2016. For this, we need to follow the Following Steps.
Step1. Open “Server Manager Console”, From the “Dashboard”, click on “DNS” > Right Click on Server IP Address and Select “DNS Manager”.

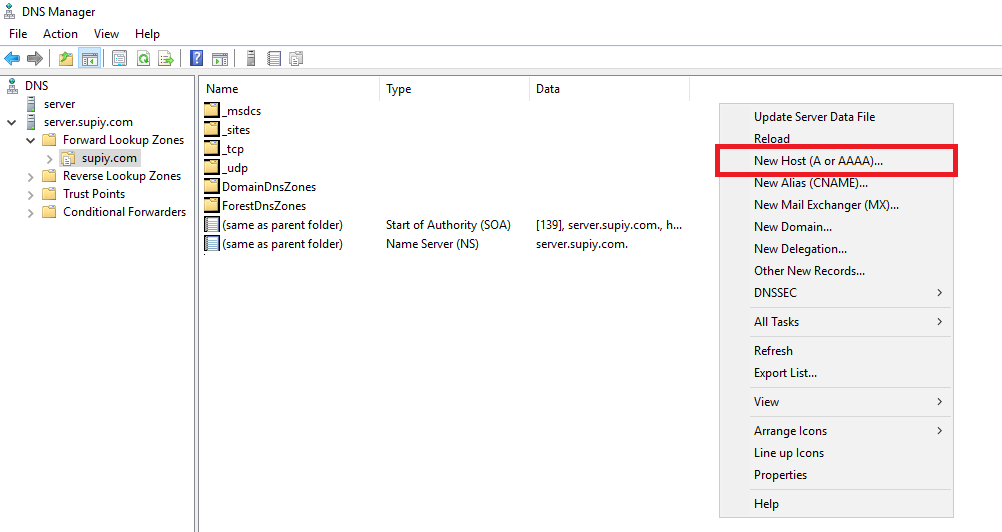
Step 2. Now DNS Manager will Open. From the Left, Panel Expand the “Server Name” and then Expand “Forward Look Zones”.
Step 3. Click on “Domain name” and Right Click on the Empty Field and Click on “New Host (A and AAA)”.
Step 4. Now a New Dialog Box will appear with the title “New Host”.
- The first field is “Name (uses parent domain name if blank)”, here you have to type the Computer’s hostname to add a new record.
- The second field is “Fully qualified domain name (FQDN)”, Check that there should primary DNS suffix has to be automatically added to the name in this field.
- The third field is “IP Address”, here you have to type the IP address of the target computer.
- Next, select the Checkbox and “Create the associated pointer(PTR) record”.
- Finally, Click on “Add Host” to add the Host to the DNS Records.

In my case, I put “192.168.1.20” in the IP Address field so that when I type “esxi.supiy.com” it will point to “192.168.1.20”.
Congratulations! finally, we have Successfully added a DNS host Record in the DNS Server for a client system. you can add client DNS records like this. In the next Part, we will discuss about Active Directory and its installation in Windows Server.
Download the “Tutorials for Windows server” Android application from the play store now so that you can have access to all the information related to Windows Server.
Conclusion
So this guide is all about how to add or manage records in DNS Server. With these steps, you can add any client DNS records to the DNS Server. Hope you like this cool trick, do share this trick with others too. Leave a comment below if you have any related queries about this.
Great Article